
If you want to know how to retouch skin naturally in Photoshop, work in layers: duplicate the background, fix exposure and white balance, build a soft skin selection, even out tone with a Curves layer, soften texture lightly, clean up individual blemishes with healing tools, then dodge and burn at low flow. The goal is even skin that still shows pores and reads as a photograph. Most beginners skip straight to smoothing, and that shortcut is what produces the plastic look everyone complains about.
Natural skin retouching means cleaning up blemishes, evening out uneven tone and softening harsh shadows while deliberately keeping skin texture, pores and distinguishing features intact. If the pores are gone at 100 percent zoom, you went too far.
Table of Contents
- What You Need
- How to Retouch Skin Naturally in Photoshop: Step by Step
- 1. Set Up a Nondestructive Retouching Workflow
- 2. Correct Exposure and White Balance First
- 3. Select Skin Without Hard Edges
- 4. Even Out Color With a Curves Adjustment Layer
- 5. Soften Texture Without Removing Pores
- 6. Reduce Distractions With Healing and the Clone Stamp
- 7. Add Subtle Light With Dodge and Burn
- How to Retouch Skin Naturally Without Losing Texture
- Common Mistakes
- How to Keep Photoshop Skin Retouching Subtle
- Frequently Asked Questions
- Conclusion
What You Need
You need a few things in place before you touch a single pixel, and none of them are complicated. Missing preparation is the reason so many retouches end up needing to be restarted.
- Adobe Photoshop — desktop version. These steps are written for the 2025 and 2026 releases, and the menu names have been stable across recent versions.
- A high-resolution portrait — ideally a RAW file converted to 16-bit, which gives frequency separation much more room to work. A heavily compressed JPEG will show its artifacts after smoothing.
- A calibrated display — a laptop panel in a bright room will convince you that skin is blotchy when it is not. Ten minutes with a hardware calibrator pays for itself.
- A soft round brush — a basic 3 to 5 pixel hard-ish brush for dodge and burn, plus a large soft brush for anything tonal.
- A comparison setup — a visible duplicated Background layer you can toggle on and off, so you judge the retouch instead of your memory of the original.
People who get natural-looking results spend less time retouching than people who struggle. The preparation is what keeps the retouch to a reasonable length.
How to Retouch Skin Naturally in Photoshop: Step by Step
The workflow below runs in a fixed order, and the order matters more than any individual tool. Color correction first, then selection, then tone, then texture, then small distractions, then light.
Skipping ahead is what produces waxy, plastic or overprocessed faces. Each step also has a checkpoint so you know it worked before moving on.
1. Set Up a Nondestructive Retouching Workflow
Open the image and press Ctrl+J (Command+J on Mac) to duplicate the Background layer. Rename the copy something honest like Skin Retouch, and rename the original Original – do not touch.
Lock transparency on the duplicate with the padlock icon in the Layers panel, so an errant stroke cannot land on the Background. Nondestructive here means every change stays on a layer you can hide, mask or drop.
For judging, use View > Arrange > 2 Up to see original and retouch side by side. That comparison view is how you catch what you have stopped noticing.
2. Correct Exposure and White Balance First
Neutralize the image before you retouch anything. Open Camera Raw with Filter > Camera Raw Filter, or use Image > Adjustments > Brightness/Contrast and Curves, and fix exposure and white balance while the whole frame is visible.
A neutral result means skin reads as a range of tones with no green or magenta cast, and no clipped highlights on the forehead, nose or cheekbones. Check the histogram so nothing is piled against either end.
Retouching before this step means you correct blemishes twice, because the tone changes underneath them later. Correct color first and the cleanup you do afterwards will actually hold.
3. Select Skin Without Hard Edges
Photoshop has no single perfect skin selector, so combine two tools. Start with Select > Subject to get the person, then open Select and Mask to isolate just the skin.
In the Select and Mask workspace, use the Refine Edge Brush tool at a small size with a low-feathering edge, and paint over forehead, cheeks, nose, chin and neck. Add a Subtractive brush layer below so you can subtract eyes, lips, brows and hairline without hunting for a smaller brush.
Set Smooth to 3 and Feather to 0.5 pixels, Shift Edge to -10 percent to pull the selection away from hair, then check Output To for Layer Mask. Hair edges are where most halos come from, and a negative edge shift fixes most of them.
For clothing and background, subtract them in the same view. If a topic keeps coming up in forums, it is this one: isolating skin so tools do not bleed onto hair and eyes. Selection Subject helps, but it rarely gets lips and brows on its own.
4. Even Out Color With a Curves Adjustment Layer
Add a Curves adjustment layer above the skin layer and clip it with Alt-click between layers (Command-click on Mac). Painting is now limited to the skin mask, and everything stays reversible.
Reduce blotchiness by dropping the red channel a touch where skin looks ruddy, lifting the blue channel slightly where it looks sallow, and only touching green if the cast is obvious. Small movements are enough — a few points, not a full S-curve.
Targeted channel corrections on the red and blue channels work far better than desaturating the entire portrait, because desaturating flattens everything at once. If you want more detail on how the curve behaves, my guide to using Curves in Photoshop walks through the mechanics.
5. Soften Texture Without Removing Pores
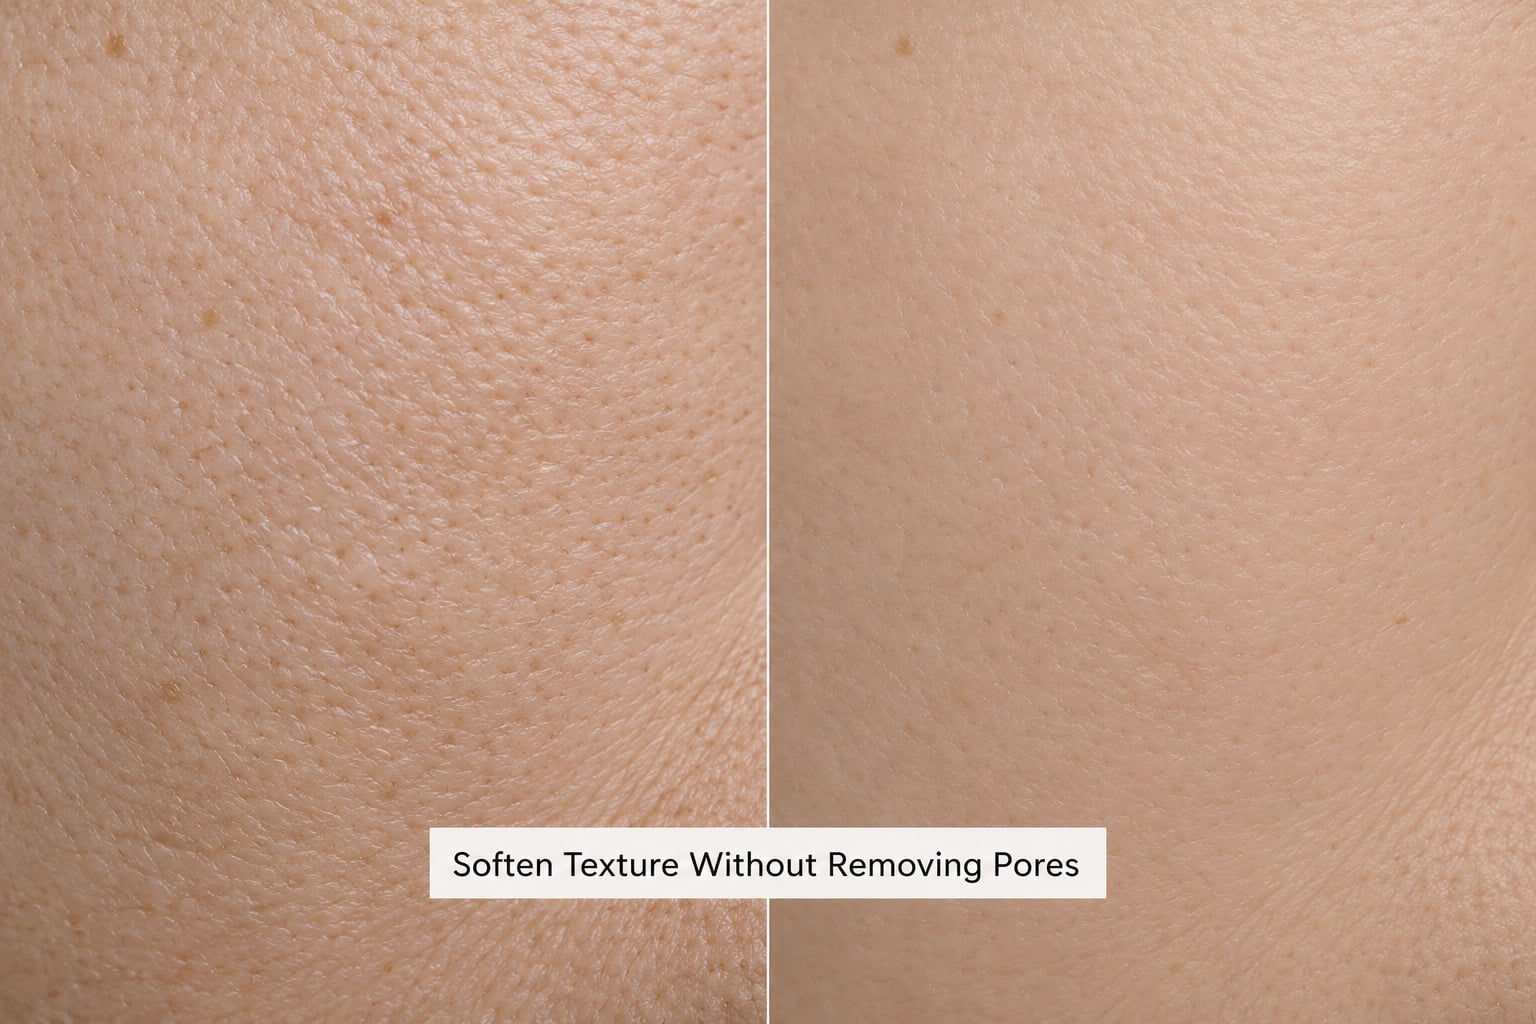
There are three ways to soften texture here, and all three work best at low opacity with the skin selection active. None of them should erase pores.
Select and Mask Smooth: with the skin layer selected, open Select and Mask, set Smooth to 15 and Feather to 0.5 pixels, then Output To a new layer mask. Check the result at 100 percent immediately — Smooth above about 20 starts looking waxy on most skin.
Frequency separation: this splits tone and texture onto separate layers so you can fix one without touching the other. Duplicate the skin layer, convert it to a Smart Object, then use the 16-bit Apply Image method: select the red, green and blue channels and the top layer only, set Gaussian Blur to a radius matching the image resolution, and invert a layer mask on the low-frequency layer.
Blurred texture layer: on a new layer above the low-frequency layer, hold Alt and drag to create a clipping mask, set the layer to a blend mode that isolates texture, then apply Filter > Blur > Gaussian Blur at 3 to 5 pixels and drop the layer opacity to 50 percent. That is a light touch, which is the point.
Set the blur radius so you can still see texture, not just tone. The rule of thumb most retouchers use: if the high-frequency layer has no visible detail in it, the radius is too large.
6. Reduce Distractions With Healing and the Clone Stamp
Use the Spot Healing Brush for isolated blemishes. Set Sample All Layers, click once rather than dragging, and use Content-Aware for the fill. Sample All Layers matters because it heals across every layer below, which is what keeps the fix invisible.
Use the Healing Brush when the Spot Healing result smears or repeats a pattern. Hold Alt to set a sampling source from nearby clean skin, keep Aligned ticked for consecutive strokes, and match the source texture rather than the brightest patch nearby.
Reach for the Clone Stamp only when you need precise control over direction, such as filling in a detail the skin mask removed. Alt-click to set your source point, keep Aligned on for repeated strokes, and set Opacity to roughly 60 percent. My guide to the Clone Stamp Tool covers source picking in more detail.
After every few clicks, zoom out one step and back in. Smeared texture, halos and small repeated patterns are obvious at normal size and invisible at 100 percent, which is exactly backwards from how you work.
7. Add Subtle Light With Dodge and Burn
Dodge and burn is what evens out blotchy tone without touching color, because it only changes light and dark. Create a Curves adjustment layer, set its blend mode to Luminosity, and click the mask to stop it affecting skin color at all — Luminosity protects hue and saturation.
Create a second Curves layer set to Luminosity with its mask filled with black. Paint white into the mask at 1 to 5 percent flow to dodge, and paint black into the other mask to burn. Use a soft brush, no feather beyond the default, and check the histogram after each pass.
Never dodge eyes upward or burn the lid crease, or you change how the subject looks rather than how the light falls. Luminosity blend mode versus Overlay is worth understanding before you start — how to use blend modes in Photoshop covers the difference.
How to Retouch Skin Naturally Without Losing Texture
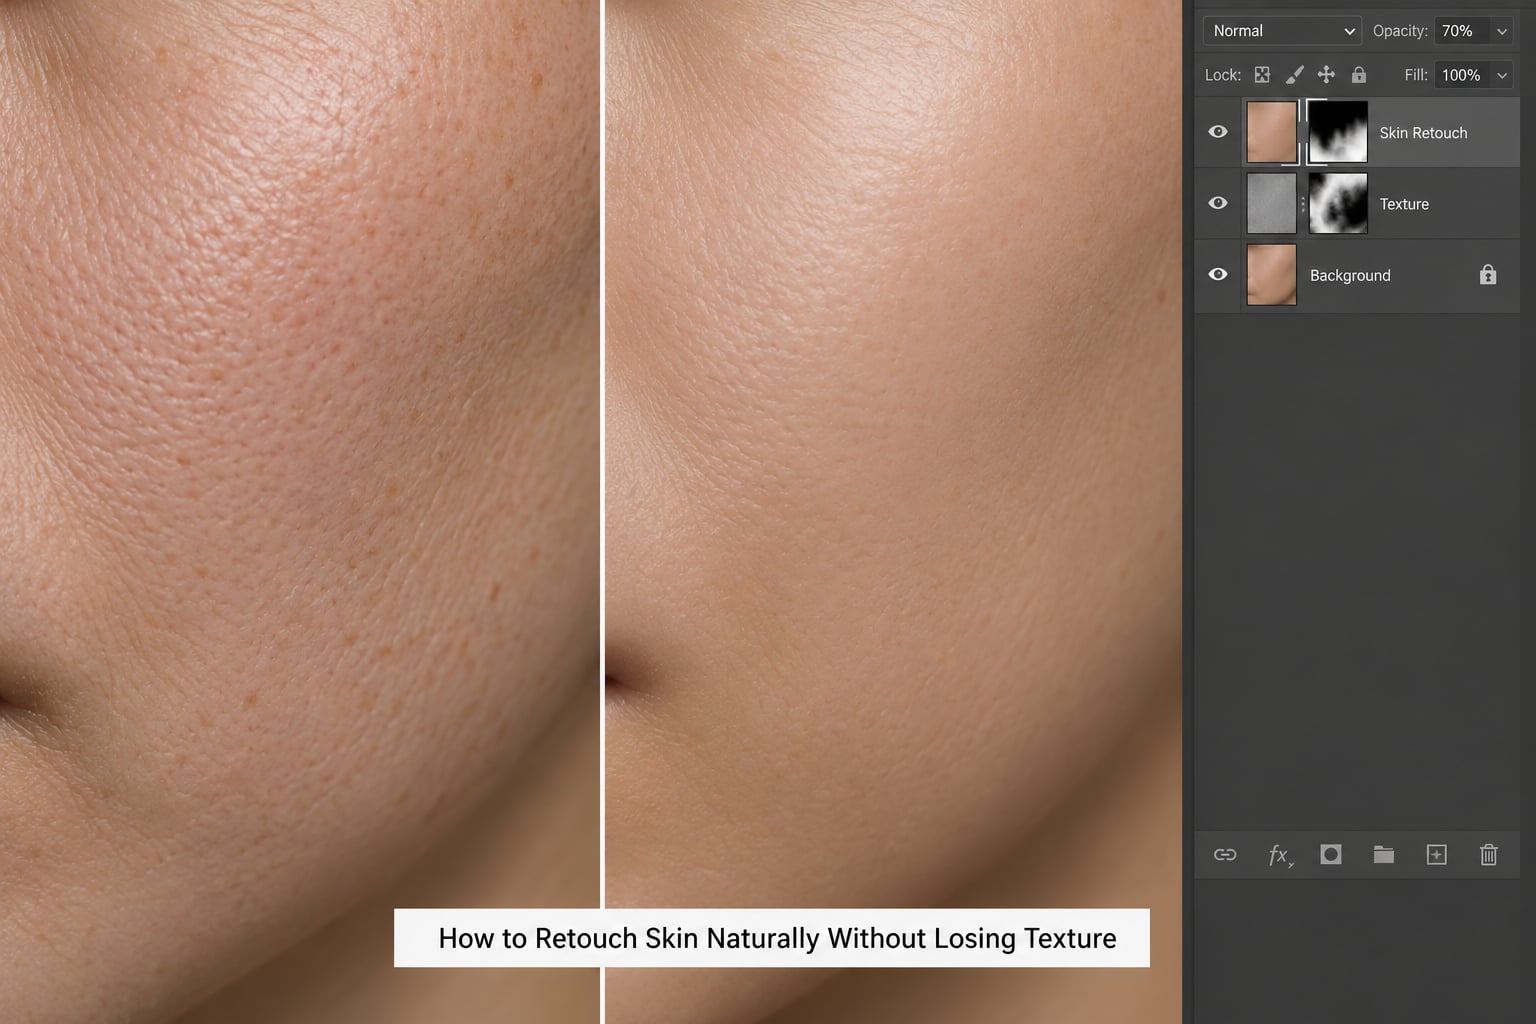
Quality control is a separate pass, done after all the editing rather than during it. Check four things at 100 percent zoom: pores still visible, tonal variation still present, natural asymmetry intact, and no halos around hair or jaw.
Then view the portrait in grayscale to catch color casts your eye compensates for automatically, and view it at fit-on-screen size to see it the way a client will.
Inspect the skin mask itself with Alt-click on its thumbnail. Every stray edge becomes obvious with the image hidden, and it is faster to fix than to discover it in the export.
Reduce layer opacities rather than deleting work. If the dodge layer feels too strong at 100 percent, try 60 percent instead of reworking it — and stop as soon as the skin looks even at normal viewing size. That is the stopping rule most beginners are missing.
Common Mistakes
Most plastic-looking portraits come from one of a small number of errors, and each has a straightforward fix.
- Over-smoothing. If pores vanish, lower the Smooth value or the blur radius, raise the layer opacity gap, and accept some texture.
- Healing from the wrong source. Sampling from the brightest nearby patch leaves a visible smear. Sample from skin at the same depth and brightness as the target.
- Hard selection edges. Hair and jawline halos come from Feather at zero. Use 0.5 pixels and Shift Edge at -10 percent.
- Desaturating the whole face. It flattens everything at once. Correct red, green and blue on separate Curves channels instead.
- Heavy dodge and burn. Above about 5 percent flow on a soft brush, you start sculpting the face rather than evening the light. Keep flow low and build in passes.
- Visible masks and edges. Paint at the mask edge or soften it with a low-opacity soft brush.
- Sharpening after retouching. Global sharpening amplifies every artifact. Sharpen texture selectively, and only at low amount.
- Never comparing to the original. If you do not check the before and after regularly, you will overshoot without noticing.
How to Keep Photoshop Skin Retouching Subtle
Zoom out regularly, change opacities in small increments rather than building up from 100 percent, and keep some tonal variation because real skin is never perfectly even.
Save a flattened comparison before and after, then look at both with fresh eyes the next day. What looked subtle last night often turns out to be too smooth.
On whether it is ethical to retouch at all, it depends entirely on the context. Photojournalism policies are strict enough that even removing a blemish can violate them, while commercial and beauty work permits it. Clients with products whose accuracy matters usually say retouching is not allowed, so ask before you start rather than after delivery.
Frequently Asked Questions
Should I use frequency separation to retouch skin in Photoshop?
Yes, if you want to fix tone without touching texture. Frequency separation puts color and light on one layer and texture on another, so you can even out blotchy areas while pores stay exactly where they were. It is more setup than a blur, but for close-up portraits it gives the most control with the least risk of plastic skin.
What is the best setting for frequency separation skin retouching?
There is no single correct radius, but the rule is to blur until you can no longer see texture, only tone. On a 4000 pixel wide portrait, start around 15 to 20 pixels and adjust. Work at 16-bit for smoother blending, keep the low-frequency layer on a Linear Light or Luminosity blend mode, and use low flow on a soft brush.
Can I retouch skin naturally on a low-resolution portrait?
You can, but your ceiling is lower. Below roughly 1200 pixels on the long edge there are not enough real pixels to hide a healing pass, and smoothing turns skin to mush. Work smaller adjustments, lower the Smooth value, and lean on dodge and burn rather than cleanup, since tone correction adds detail instead of removing it.
Why does my retouched skin look plastic or fake?
Usually one of four things: you smoothed too far, you desaturated the whole face, you dodged and burned at high flow, or you never compared against the original. Fix it by dropping layer opacities rather than deleting work, restoring some pores and tonal variation, and adding back a small amount of selective sharpening on texture only.
Is the Camera Raw Texture slider better than skin smoothing?
The Texture slider is gentler than manual smoothing because it recovers micro-contrast instead of blurring. It works well as a finishing pass after healing and dodge and burn, lifted maybe 5 to 15. It cannot fix tone or blotchiness on its own, so it complements frequency separation rather than replacing it.
Conclusion
Start by neutralizing exposure and white balance on a duplicated layer, then build a soft skin selection with a negative edge shift so hair stays clean. From there, correct tone with a clipped Curves layer, soften texture lightly enough that pores survive, clean up individual blemishes with the Spot Healing Brush set to Sample All Layers, and finish with dodge and burn on two Curves layers set to Luminosity at 1 to 5 percent flow.
Then zoom out. If the skin looks even at normal viewing size with texture still visible, you are done — and that is how to retouch skin naturally in Photoshop without spending another hour on a face that was already fine.