
What is luminosity masking? It is a selection technique that targets an image by brightness rather than by shape or color, so you can adjust shadows, midtones and highlights on their own. The mask is built from luminance data already stored inside the file, which is why its edges follow the tones in your photo and leave no hard border behind. Building your first family of masks takes about ten minutes.
That last part is the reason this technique stuck around. Anyone can brush black over a sky to darken it, and plenty of people have lived with the halo that leaves behind. A luminosity mask replaces the hand-painted edge with one derived from the picture itself.
Table of Contents
- What Is Luminosity Masking?
- How Does Luminosity Masking Work?
- What Can Luminosity Masking Control?
- How Do You Create a Luminosity Mask?
- When Is Luminosity Masking Better Than Other Editing Methods?
- How to Use Luminosity Masking for Creative Photography
- Common Luminosity Masking Mistakes and How to Fix Them
- Frequently Asked Questions
- Is luminosity masking the same as a black-and-white adjustment?
- Can I use luminosity masking for color photographs?
- Should I use curves or brush selection for tonal control?
- Does luminosity masking work for HDR and merged photographs?
- How do I know whether a mask is affecting the right tones?
- What is the difference between luminosity masking and dodging and burning?
- Where to Start With Luminosity Masking
What Is Luminosity Masking?
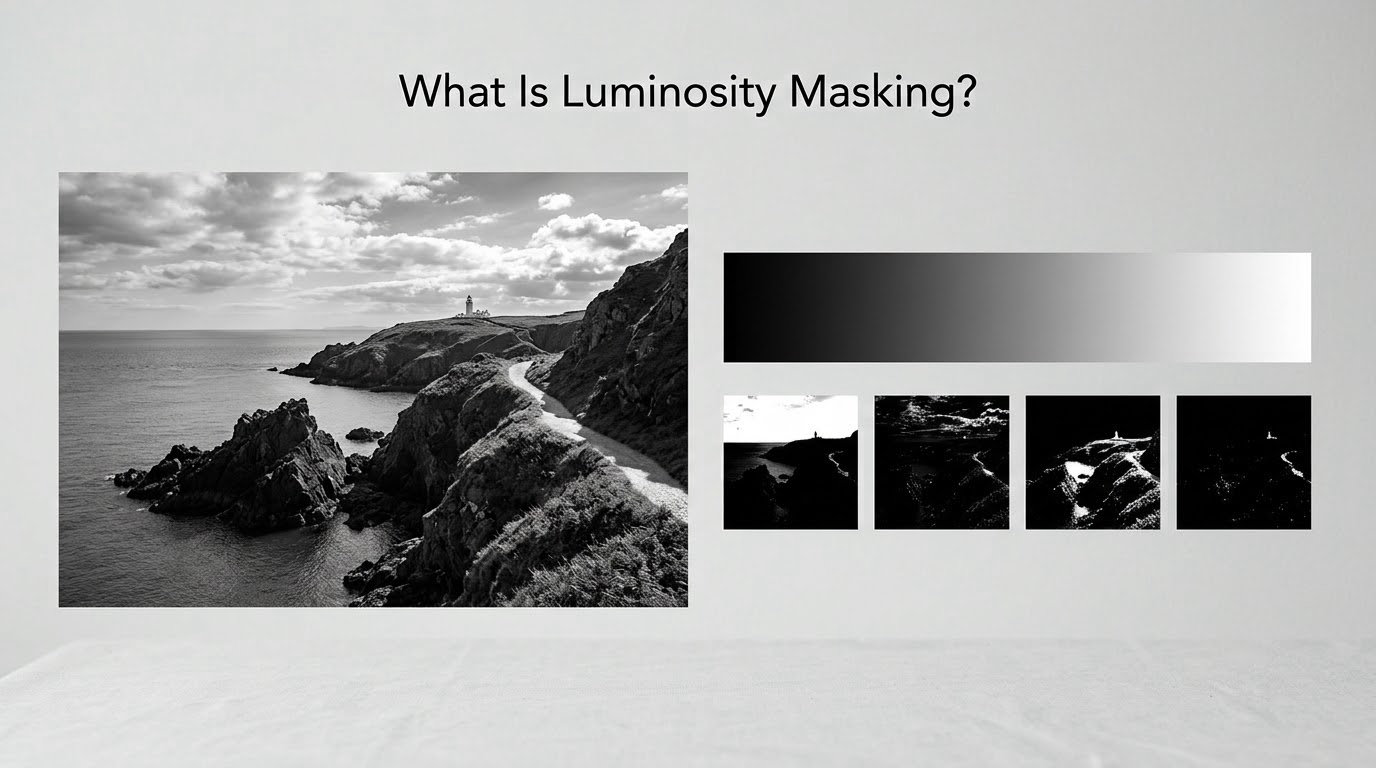
A luminosity mask is a grayscale selection built from the brightness values of every pixel in your image. Bright pixels go white, dark pixels go black, and the grey in between maps smoothly, so an adjustment applied through that mask lands only on the tones you selected.
The three ideas underneath it are simple: the map is pixel-based, it feathers itself, and it comes in tonal families. Once those click, the rest is button work.
What is luminosity masking in Photoshop, exactly?
In Photoshop, a luminosity mask is a saved selection, stored as an alpha channel, that isolates a range of tones in the photograph. Loading a channel as a selection gives you marching ants around the brightest or darkest areas, and that selection can then drive a layer mask, a curves adjustment, or a painted dodge and burn layer. The mask itself contains no image data. It is just a brightness map kept alongside the file.
Photoshop does not ship this as a menu item. You build the channels yourself, once per file, or you install a panel or action that builds them for you. The manual method takes a couple of minutes after the first time, because the channels are saved in the document and travel with it.
What is the purpose of masking?
Masking exists to limit a change to part of an image without committing to a hard edge. A mask is a grayscale sheet where white reveals the layer beneath and black conceals it, with grey giving partial effect. That single idea powers layer masks, selection-based masks, brush masks, colour range masks and luminosity masks. The difference between them is only how the grayscale sheet gets made.
Is a luminosity mask the same as the Luminosity blend mode?
No, and the naming collision causes real confusion. The Luminosity blend mode takes the brightness of the layer on top and the colour of the layer below, which is a compositing behaviour. A luminosity mask is a saved selection built from brightness. One changes how two layers combine; the other decides which pixels an adjustment is allowed to touch. If you have typed “luminosity” into Photoshop’s blend mode list looking for this technique, you will not find it there.
How Does Luminosity Masking Work?
Photoshop reads the image’s red, green and blue channels and combines them into a single brightness map. From that one map you generate a stack of selections, each one narrower than the last, so you can address almost any slice of the tonal range.
The map is built from pixel luminance
Every pixel in a photograph carries a luminance value derived from how much light it represents. Click a channel in the Channels panel and Photoshop creates a selection of every pixel brighter than 50% grey. Save that as a channel and you have Brights1. Run the same command again and you get Brights2, which holds only the pixels brighter than roughly 70% grey, because the threshold now starts from Brights1 rather than from zero.
That is the whole trick behind the “1 through 6” naming. Each number is a higher threshold, not a separate kind of mask.
It feathers itself
Because the map is continuous rather than binary, a mask does not have a border. Mid-grey values sit along every transition, so an adjustment fades in and out instead of switching on. Photographers call this self-feathering, and it is the reason luminosity masks dodge brush halos around hair, ridges and window edges.
It comes in three tonal families
Same map, different starting point. Lights are built from the top of the range, Darks from the bottom, and Midtones from the full selection minus both ends.
| Family | What each channel selects | Typical job |
|---|---|---|
| Lights 1 to 6 | Successively brighter pixels, starting above 50% grey | Highlight recovery, sky and water control, highlight texture |
| Darks 1 to 6 | Successively darker pixels, starting below 50% grey | Shadow recovery, foreground separation, opening up rock and foliage |
| Midtones 1 to 6 | The middle band, with Lights and Darks subtracted out | Local contrast, subject pop, colour grading weight |
Most working files only need three or four of them. Creating all eighteen triples the channel data in the file, and you will rarely touch more than a handful.
Luminance, luminosity, brightness and exposure are not the same thing
The vocabulary confuses people early, so here is the short version.
| Term | What it means |
|---|---|
| Luminance | The measured brightness of a pixel, the value the mask is built from |
| Luminosity | Adobe’s word for that brightness in the blend mode and in the technique’s name |
| Brightness | A perceptual description, not a measurement |
| Exposure | The light that reached the sensor, already fixed by the time you edit |
| Tone | A region of the tonal range, such as a highlight or a midtone |
What Can Luminosity Masking Control?
Anything that should change differently in bright areas than in dark ones. The mask decides where the adjustment lands, and the adjustment type decides what happens there.
Highlights. A Lights mask with a curves or exposure adjustment lets you pull back a blown sky without flattening the foreground in the same pass. Because the mask only opens on the bright pixels, the shadow detail stays exactly where you put it.
Shadows. A Darks mask recovers detail under a foreground ridge or lifts a face out of a low-key scene. Stack two Darks masks, each on its own layer, and you can open the deepest shadows a little and the near shadows a lot without a visible step between them.
Midtones. Midtones carry most of the local colour and most of the perceived sharpness, so this is where contrast and colour adjustments do the least damage to the rest of the picture. A Midtones1 mask on a curves layer is the standard way to add contrast that stays inside the tonal range.
Contrast and brightness transitions. Because a mask fades rather than cuts, you can darken one side of a soft gradient, like a sky above a horizon, and the fade happens where the sky itself is changing brightness. A painted mask cannot do that without you matching the gradient by eye.
Detail and sharpness. Sharpening that is restricted to the midtones avoids the crunchy halos you get when clarity or sharpening touches specular highlights. The same idea drives targeted noise reduction, which matters a lot on high-ISO night work.
How Do You Create a Luminosity Mask?
You build the channels once in the Channels panel, then reuse them on any layer for the rest of the session. Work on a flattened copy of your RAW conversion so the original file stays clean.
Build the Lights channels
Open the Channels panel (Ctrl+3 on Windows, Cmd+3 on Mac) and click the RGB composite channel to make sure it is highlighted. Hold Shift, Alt and Ctrl on Windows, or Shift, Option and Command on Mac, and press the tilde key once. That is the select-bright-pixels command.
Marching ants appear around the brighter half of the frame. Now click the second small icon at the bottom of the Channels panel, Save Selection as Channel, name it Brights1, and press Enter.
Repeat the shortcut without saving in between. Each pass starts from the previous selection, so the threshold climbs and the next channel holds fewer, brighter pixels. Save each one as Brights2 through Brights6.
Build the Darks channels correctly
Here is where several popular tutorials go wrong, so it is worth being precise. Inverting Brights1 does not give you Darks1. Inverting gives you a mask that selects everything darker than 50% grey, which is the whole shadow range in one blunt sweep rather than a graded family.
The correct method starts from the empty selection. Click the RGB channel, press Ctrl+click (Cmd+click on Mac) on Brights1 to load it, then press Ctrl+Shift+I to invert. That produces a full shadow selection. Save Selection as Channel, name it Darks1, and repeat the whole sequence for Darks2 through Darks6.
Build the Midtones channels
Midtones are the mid part of the range with the ends removed, so you subtract from a full selection. Select All, then with the RGB channel active, Alt+click (Option+click on Mac) Brights1 to subtract it. Alt+click Darks1 to subtract that too.
Photoshop may now warn that no more than 50% of the image is selected. This is expected. The midtones are by definition the smallest share of a normal image, so a dialog about the selection covering too much is just the program noticing how much you removed. Click OK to continue.
Here is the step most walkthroughs skip. Subtract the selection from the channel and nothing is stored yet. You have to click Save Selection as Channel and name the result Midtones1, then repeat the subtract-and-save cycle for Midtones2 through Midtones6. The Create New Channel button is not a substitute: it makes an empty black channel with no selection in it at all.
Apply a channel as a layer mask
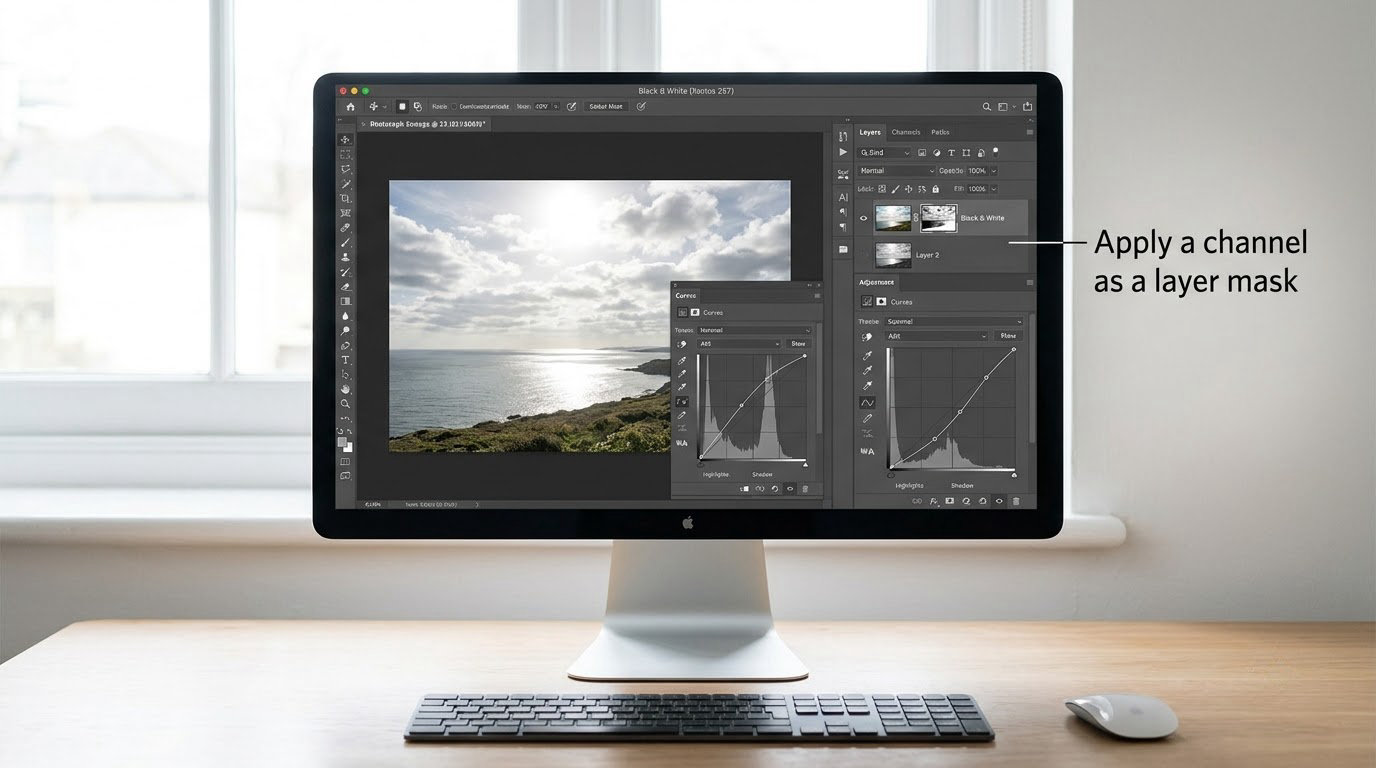
With your channels built, add an adjustment layer, curves or exposure, whichever the job needs. Hold Alt (Option) and click the adjustment layer’s mask thumbnail to select the black mask, then Ctrl+click (Cmd+click) the channel you want in the Channels panel. The marching ants land on that layer’s mask.
Fill it with the adjustment. The layer now changes only the tones you picked. Refine the range rather than the strength when something looks off, since narrowing the mask keeps the result natural.
When Is Luminosity Masking Better Than Other Editing Methods?
Luminosity masking wins when you want a tonal change that looks like it was always there. It loses when speed matters more than subtlety, or when the light in the frame was simply wrong.
| Method | Edge quality | Best for | Weak spot |
|---|---|---|---|
| Luminosity mask | Soft, tonal, no halos | Range-wide exposure, contrast and colour work | Slower to set up than a brush |
| Brush on a mask | Depends entirely on your hand | Local, deliberate, creative control | Halos and hard edges on high contrast |
| Selection tools | Hard by default, featherable | Working inside a known shape | Feathering washes out fine detail |
| Curves and sliders | Applies to the whole image | Global tone and colour shifts | Cannot separate tones on their own |
| HDR merge | Depends on the merge | Bracketed scenes with big gaps | Flat look and ghosting if shots misalign |
Against dodging and burning, the honest answer is that they pair rather than compete. A Darks mask loaded as a selection lets you dodge and burn with a hard-edged brush while still keeping a soft outer transition, which is the best of both.
Against HDR merging, luminosity masking usually comes out ahead for a single exposure. If you only have one bracket, or a still subject, a series of exposure adjustments on Darks and Lights masks recovers the same range and keeps the tonal transitions natural, where an HDR merge often looks compressed and flat.
And it will not save a bad frame. Masks are built only from the light you captured, so a blown sun or a subject lit from a hard side stays blown or stays harsh. Shoot the light properly first.
How to Use Luminosity Masking for Creative Photography
Once the mechanics are routine, the technique opens up in ways brush work makes awkward.
Black-and-white with real contrast. A Midtones1 mask on a curves layer adds contrast where your subject lives, while a Lights mask deepens skies and a Darks mask keeps shadow texture from clogging. The result holds together in monochrome, where a poorly judged global curve would fall apart immediately.
Composites that actually match. When you merge two frames, a Lights mask on the blended layer pulls the new element’s brightness into line with the existing one, and a Darks mask handles the shadow side. Matching midtones by eye never works as well as matching them by map.
Photomontage with directional light. Once a montage holds together tonally, you can push the light further than reality allows. Using a Darks mask on one element and a Lights mask on another lets you stage a light source that the original photographs did not share.
Soft tonal transitions in skies and water. A gradient is the classic case. A Lights mask fades across the gradient naturally, so darkening a sunrise or calming a reflection needs no hand-painted blend line.
Separating a subject from a busy background. Masking the midtones of the subject and dropping a curves layer through it can darken the surroundings and lift the subject in the same pass, which is faster than building two separate selections.
Lightroom and Camera Raw have supported native luminosity masking since 2017, via the Masking menu under a Curves adjustment. It is built into the develop module, which makes it far quicker for straight tonal work, and it lacks the saved-channel workflow, so you cannot reuse a mask set across several images as you can in Photoshop.
Common Luminosity Masking Mistakes and How to Fix Them
Most of the confusion in the comment sections under these tutorials comes from the same handful of mistakes.
Inverting Brights1 to make Darks1. It produces a selection of everything below 50% grey, which flattens all your shadow work into one undifferentiated layer. Build Darks from an inverted Brights1 selection saved as a channel, and step down from there.
Forgetting Save Selection as Channel. After you subtract Brights1 and Darks1 from a full selection, the midtones exist only as marching ants. Until you click Save Selection as Channel and name it, nothing is stored and the next step will not find it.
Using Create new channel instead. That button gives you an empty channel. It is the reason a reader following one tutorial ends up with a mask that does nothing at all.
The 50% warning treated as an error. Photoshop’s message that no more than 50% of pixels are selected is normal when building midtones. Accept it and carry on.
Harsh or inverted results. Usually a mask problem, not a curves problem. Look at the mask alone by holding Alt (Option) and clicking the mask thumbnail. If the affected area is not where you expected, the selection is wrong, and no amount of curve adjustment will fix it.
Muddy shadows and blown highlights. You are probably applying one adjustment to too wide a range. Switch to a narrower channel, Midtones3 rather than Midtones1, and open or close it less.
Unexpected colour shifts. A tonal mask has no colour awareness at all, so it cannot tell a warm sky from a warm face inside it. When an adjustment shifts hue, add a color range selection and intersect it with the luminosity selection.
Files that balloon in size. Every saved channel is extra pixel data, and a full set of eighteen adds a lot. Delete the channels you are not using before you export, and avoid saving flattened copies with the full set still attached.
Over-processing. A luminosity mask makes it easy to add contrast that is not there in the scene. Compare against the original at 100% now and then, and pull the strength back when you can see the edit from arm’s length.
Frequently Asked Questions
Is luminosity masking the same as a black-and-white adjustment?
No. A black-and-white adjustment layer converts colour into monochrome by removing hue from the whole image. A luminosity mask leaves the colour alone and instead uses brightness to decide where an adjustment applies. The two are often used together: a luminosity mask picks the tones, and the layer it drives may well be a black-and-white conversion or a colour grade.
Can I use luminosity masking for color photographs?
Yes, and most of its useful work happens in colour. Lights, Darks and Midtones masks drive exposure, curves, saturation and colour balance adjustments that should hit different parts of a colour frame. Because the mask only reads brightness, it ignores hue entirely, which is why a graded adjustment can shift the wrong colours inside a selected tonal range unless you combine it with a color range selection.
Should I use curves or brush selection for tonal control?
Use curves for anything driven by tone and brush selection for anything driven by shape. A luminosity mask plus a curves adjustment controls a whole range of the image with a natural falloff, which no hand-painted brush edge matches on high-contrast detail. Load a channel as a selection when you want to dodge and burn with a hard brush, because the hard stroke then fades out at the selection’s soft edge instead of stopping dead.
Does luminosity masking work for HDR and merged photographs?
Yes, and it is often the better route for a single exposure. With bracketed frames, an HDR merge compresses the result toward a middle grey look and can ghost if the shots misalign. Using Darks and Lights masks on separate exposure layers achieves a similar recovery of dynamic range while keeping the tonal transitions of the original scene, which matters most on skies, water and night work.
How do I know whether a mask is affecting the right tones?
View the mask on its own. Hold Alt (Option) and click a layer mask thumbnail to display it as a black-and-white sheet, where white reveals and black conceals. In the Channels panel, Ctrl+click (Cmd+click) a channel to see the same thing as marching ants. If the white area does not cover the tones you meant, the channel is wrong and no amount of curve adjustment will rescue the result.
What is the difference between luminosity masking and dodging and burning?
Dodging and burning is the technique of painting light and dark onto an image to shape its tones. Luminosity masking is the technique of selecting which tones an adjustment is allowed to touch. Combining them gives you the control of dodge and burn without the halos, because a loaded channel selection lets a hard-edged brush stroke fade out smoothly at the selection boundary.
Where to Start With Luminosity Masking
Build Brights1 through Brights3 and Darks1 through Darks3 on the next file you edit, using the manual steps above so you know what the channels contain. Load Darks1 on a curves layer, open the shadows, and compare the result with the untouched original at full size. Once that feels ordinary, add the midtones and you have a working mask set. If you want the tonal side of this sorted first, read up on what dynamic range means in photography, since that is the problem these masks were built to solve.