

Foreground interest is a distinct, detailed element placed in the nearest part of the frame that anchors the viewer, gives the image depth, and leads the eye from the front of the picture toward your subject. In most compositions it sits in the lower third. Used well, it is the quickest fix for a photograph that looks flat and distant.
The technique is mostly about where you put your feet, not what camera you own. The whole workflow takes a couple of minutes in the field once you know what you are scanning for, and it works just as well on a phone as on a full-frame body with a fast wide-angle lens.
Table of Contents
- What You Need
- Step-by-Step: Build a Composition Around Foreground Interest
- 1. Identify the Main Subject and Visual Priority
- 2. Look for Foreground Elements with Texture or Shape
- 3. Position the Foreground for Depth and Framing
- 4. Choose the Right Focus and Depth of Field
- 5. Use Light, Color, and Contrast to Separate the Layers
- 6. Check the Edges and Simplify the Frame
- 7. Capture Variations and Refine the Best Result
- Common Mistakes and How to Fix Them
- Frequently Asked Questions
- What counts as foreground interest in photography?
- How much blur should I use on a foreground element?
- How can I use foreground interest with a phone camera?
- Should the foreground be darker or lighter than the subject?
- How do I stop a foreground from distracting from my subject?
- Where should the foreground sit in the frame, and does the rule of thirds apply?
- Conclusion
What You Need
The gear list here is short. Anything that produces a sharp file will carry a foreground; the difference between a good one and a bad one is placement and focus, not equipment.
- Any camera or phone. A smartphone with a rear main camera and a Pro or equivalent mode that locks focus and exposure is genuinely enough. Tap the subject on screen to lock focus, then lower the exposure one notch so the foreground does not blow out.
- A candidate foreground within a few feet of the lens. Anything that holds detail: a rock with lichen, a fern frond, a chain-link fence, a railing, a cracked plank, a puddle, tall grass, a shadow falling across the ground.
- A decision about visual priority. Before you frame anything, you need to know whether the foreground, the subject, or both will be sharp. You cannot fix that afterwards.
- A way to review at small size. The back of the camera, not the phone screen. A foreground problem that is obvious on a five-inch display is often invisible on a monitor.
Focal length changes how strongly the foreground exaggerates, so it is worth choosing deliberately rather than defaulting to whatever is on the camera.
| Focal length (full frame) | Effect on the foreground | Where the camera goes | Best used for |
|---|---|---|---|
| 14mm to 20mm | Extreme exaggeration; near objects loom large and edges stretch | Low to the ground, often inches above it | Bold, immersive layers; dramatic scale in open terrain |
| 35mm | Gentle exaggeration, still natural | Kneeling or crouching | Street, travel, scenes with clutter to push past |
| 50mm to 100mm | Mild perspective; foreground reads as a natural frame | Standing, with a longer walk back | Portraits, architecture, tighter layered views |
| 200mm and beyond | Compression; the foreground stacks against the background | Standing, distant | Isolating a small foreground element against a big subject |
Wide angles magnify whatever is closest to the lens, which is why a 14mm frame from ground level can turn a handful of pebbles into a dominant frame. Telephotos do the opposite: they flatten the gap, so a single fence post can read as if it belongs to the mountain behind it.
Step-by-Step: Build a Composition Around Foreground Interest
1. Identify the Main Subject and Visual Priority
Decide what the photograph is about before you add anything to the front of it. Say it out loud: the frame is about the peak, or the frame is about the person walking away from it. Once that is settled, everything in the foreground has one job, which is to support that subject rather than compete with it.
It worked for me when I started writing the subject down in the notes app of my phone before each frame. It sounds fussy, and it is, but it stops the very common failure of photographing the distant subject and forgetting the front of the frame entirely.
2. Look for Foreground Elements with Texture or Shape
Scan the ground rather than the horizon. A strong foreground usually has one of four qualities: texture you could almost feel, a clean geometric shape, a shadow with a readable edge, or a size cue that tells the viewer how big the scene is. Leaves and grass give texture. A low wall or a rope gives a line. A puddle gives reflection and a second, softer copy of the subject.
Skip anything that is visually loud but says nothing. A bright plastic bag, a sign, a cluster of unrelated debris. It will pull the eye straight out of the picture and it will not lead anywhere. The best test is whether the element belongs to the same story as the subject; if it does not, leave it.
3. Position the Foreground for Depth and Framing
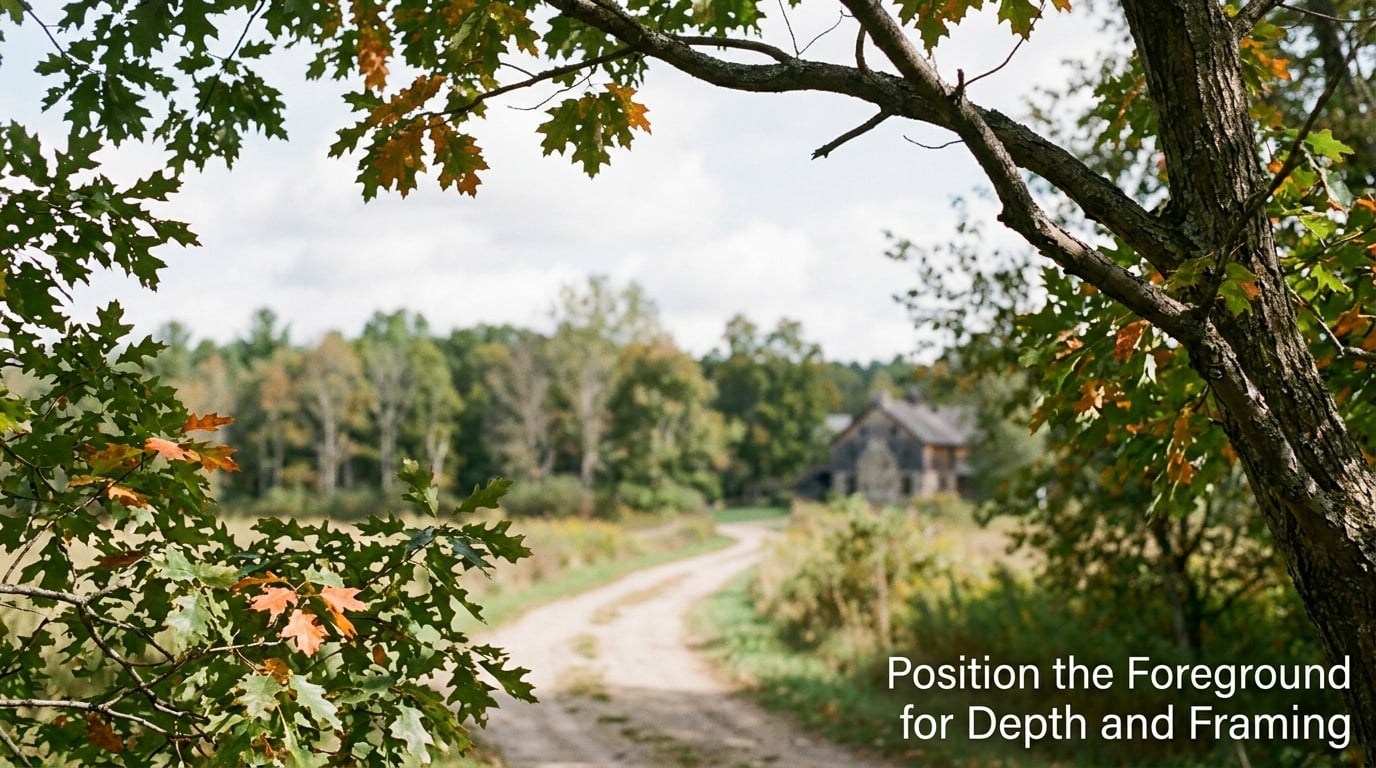
Move. Most weak foregrounds are weak because the photographer never moved closer, never crouched, or never stepped a pace to the left. Three changes cover almost every situation: get physically closer to the foreground element, lower the camera until the lens is near the height of what you are shooting past, and walk sideways until the element no longer overlaps the subject.
Once positioned, the foreground can do one of four jobs. It can lead, with a path, wall, or line carrying the eye toward the subject. It can frame, entering from one edge to close the composition without boxing the subject in. It can layer, stacking two or three readable planes so the image feels deep. Or it can anchor, holding the bottom of the frame so the picture feels planted rather than floating.
Watch the overlap. A twig crossing your subject’s face at the exact point of the eye is the single most common way a good foreground ruins a good frame. Shift a foot and the problem disappears.
4. Choose the Right Focus and Depth of Field
You have three workable strategies, and mixing them up is what causes confusion. The simplest advice I can give a beginner: shoot deep first, so everything from the foreground to the subject is sharp, then experiment once you trust your eye for shallow depth of field. That is the consensus on photography forums too, and it is sound.
- Everything sharp. Use a single focus point on the subject, an aperture around f/8 to f/11, and check that the foreground is not softer than you want. If it is, stop down further or step back a little.
- Sharp foreground, softer subject. Focus on the near element at a wider aperture, around f/2.8 to f/4. This works when the foreground is genuinely the subject, and it is a good way to hide a cluttered background.
- Soft foreground, sharp subject. Focus on the subject and let the near element go to a blur. Useful in portrait, street, and wildlife work, and the easiest way to tidy up a messy location.
On a phone, tap the screen to focus and use portrait mode for the soft option, though it fakes the blur more often than it produces it. If your near element is so close that nothing is sharp, you are too close, or you need to stop down. Focus stacking, where you take one frame focused on the foreground and one on the subject and blend them in software, rescues the hardest of these cases.
5. Use Light, Color, and Contrast to Separate the Layers
Depth is mostly a tonal illusion. If the foreground is the same brightness as the background, the brain reads them as one flat plane, no matter how much layering you built. Side light, low sun, and shadow edges are what separate them, because a raking angle picks out every texture in the near element and throws a shadow that repeats its shape on the ground behind it.
Backlight does something different: it edges the foreground with a bright rim and can turn a misty, ordinary patch of grass into something atmospheric. It also blows out the background, so check the histogram and shoot slightly under.
On the common question of whether the foreground should be darker or lighter: usually darker, because a dark near element and a bright distant subject reads instantly as near and far. Go lighter only when the subject is dark or when the foreground is genuinely translucent, such as backlit leaves. Colour helps too; a warm rock against cool distant haze separates layers without any extra equipment.
For one more layer of control, a polarising filter darkens skies and boosts surface texture, which makes both the foreground and the background easier to separate. It has no effect at a 90 degree sun angle, so turn it and watch the sky.
6. Check the Edges and Simplify the Frame

Check the four edges before you commit. A half-cut rock at the bottom edge and a stray blade of grass poking in at the right read as accidents. Either reframe to include the whole element cleanly, or exclude it entirely. Half-in is only acceptable when the element is a line that clearly continues off the frame.
Then ask the harder question: does the foreground add to the story of the picture? A cover test helps. Imagine cropping the foreground out entirely, and see whether the image loses something. If it does not, the element is decoration and you should take it out. A lot of experienced photographers shoot minimalist and abstract work with no foreground at all, and forcing one in is exactly how a clean frame becomes cluttered.
Other cases where I skip it: high-key and high-key minimal scenes where a dark near object would drag the frame down, situations where the subject is already small and the frame is already busy, and any scene where the only available element is unrelated clutter. Leave those frames clean and go looking for a different spot.
7. Capture Variations and Refine the Best Result
Shoot the same scene at least four ways: vertical, horizontal, from closer, and from further back. Add one with a different aperture and one with the foreground deliberately soft. Almost none of that is wasted, because the variations teach you which choice the scene actually wanted.
When you review, compare them at thumbnail size rather than full screen. At a glance, the version with the cleanest read and the strongest sense of space wins, and that is usually not the one you were most excited about. Zoom in afterwards to check that the sharpest layer is the one you chose, and that nothing is clipping at the edges.
Common Mistakes and How to Fix Them
The foreground swallows the frame. This happens when you get close with a wide angle and the near element grows until it eats half the picture. Step back, or zoom in, or lower the camera so the element sits along the bottom edge instead of across the middle.
Unrelated clutter gets included. A bin, a sign, a bush of dead bracken that has nothing to do with the subject. Re-scan the ground for something with shape or texture, and if there is nothing, leave the foreground out.
Layers merge into one flat plane. The problem is tonal, not compositional. Change your angle so the light rakes across the foreground, or expose so the foreground sits a stop or two under the subject. If you are editing, a couple of local darkening passes on the foreground and lightening on the subject does the same job.
Nothing is sharp. A foreground a few inches from the lens plus a wide aperture means two things cannot both be in focus. Stop down, focus deliberately on one plane, or focus stack. If neither is possible, let the foreground blur fully and treat it as a soft frame.
Edges betray the shot. Half elements and tangent overlaps. Crop in slightly or reframe; do not fix it in software unless you have to.
Chasing technical perfection. Some of the best foreground frames I have made were handheld, slightly soft, taken in flat light. Set the frame up deliberately, make sure the subject is sharp, and press the button. A clean composition survives a slightly soft file; a clever technique in a messy frame does not.
Forcing a foreground where none belongs. Minimalist, abstract, and some high-key work is stronger without one. This is the exception, and treating it as the rule is what makes the technique feel like a gimmick.
Frequently Asked Questions
What counts as foreground interest in photography?
Any distinct, detailed element in the nearest part of the frame that anchors the composition and gives the viewer a sense of space. Leaves and ferns, rocks, grass, railings, fences, branches, doorways, puddles, and shadows all count. What matters is not the object but the job it does: leading the eye toward the subject, framing it, layering the frame, or anchoring the bottom. An unrelated object with none of those jobs is clutter, not interest.
How much blur should I use on a foreground element?
Enough that the shape is readable but detail is not, usually wide open or one stop under. Heavy blur suits street, portrait, and wildlife work where the point is to push past clutter. Keep the foreground sharp in open landscape work where texture and scale are the whole reason you included it. If you are unsure, shoot one of each at the same position and decide on the small screen.
How can I use foreground interest with a phone camera?
Phone main cameras render a foreground well because the lens sits close to the middle of the frame, which makes the distance judgement less obvious. Crouch low, hold the phone with two hands, tap the subject to lock focus and exposure, then lower the exposure a notch so the near element keeps its highlights. Shoot portrait mode for a blurred foreground, and step back rather than leaning in when the near object looks too large.
Should the foreground be darker or lighter than the subject?
Usually darker. A dark near element against a brighter distant subject reads immediately as near and far, and it is the cheapest way to separate two layers. Go lighter only when the subject is dark, or when the foreground is translucent, such as backlit leaves glowing against a dark background. Either way, aim for a clear tonal break between the layers rather than a match.
How do I stop a foreground from distracting from my subject?
Move until it no longer overlaps the subject, especially around the face or the point of interest. Keep it simple: one element, one job, and no high-contrast colour fighting the subject. If the eye still lands on the foreground first, take a step back or change lenses so it occupies less of the frame. And if the frame works without it, take it out.
Where should the foreground sit in the frame, and does the rule of thirds apply?
The lower third is the reliable default because it gives the eye an entry point and leaves the upper two thirds for the subject. The rule of thirds is a useful starting position, not a law; a foreground that runs along the bottom edge or enters fully from one side works just as well when it leads clearly. What matters is separation and direction, not which third the object lands in.
Conclusion
To use foreground interest well, decide the subject first, scan the ground for one element with texture or shape, then move: closer, lower, and sideways until it leads rather than overlaps. Set focus and light so the layers separate, check the four edges, and shoot four variations before choosing. That is the whole method, and it takes less time than the searching does.
On your next outing, make it a small assignment. Pick one location, find a single foreground element, and shoot ten frames from that one position. The stack of near-identical shots is how you learn to see depth, and it is far more useful than another guide.