
An adjustment layer in Photoshop is a layer that applies color and tonal changes to everything below it without altering the original pixel data, so you can dial in a value, look at the result, and change your mind later. This guide covers exactly how to use adjustment layers in Photoshop, from adding the first one to building a clean, maskable stack you can still edit a year from now. The basics take about twenty minutes to learn; the workflow becomes automatic after a few sessions.
The idea is simple enough that it surprises people. Instead of painting brightness into your photograph, you park the brightness above the photograph as its own layer. Nothing is burned in, the eye icon turns the whole thing off, and a layer mask lets you decide where the effect is allowed to show up.
Table of Contents
- What You Need
- Step-by-Step: How to Use Adjustment Layers in Photoshop
- 1. Open the Image and Check Its Document Type
- 2. Add Your First Adjustment Layer
- 3. Make a Strong Adjustment, Then Refine It
- 4. Paint the Adjustment with a Layer Mask
- 5. Combine Several Adjustments in a Logical Stack
- 6. Adjust Only Part of the Image
- 7. Change the Effect Without Redoing the Edits
- 8. Save and Reopen the Editable File
- Common Mistakes
- Adjustment Layers vs. Image > Adjustments
- Layer Mask vs. Clipping Mask
- Blend Modes for Adjustment Layers
- Adjustment Layer Shortcuts for Windows and Mac
- Frequently Asked Questions
What You Need
You need the current version of Adobe Photoshop on Windows or macOS, one practice photograph, and about ten minutes of patience for your first pass. The steps below describe the modern interface shipped with Photoshop releases in 2026, and they also hold for the last several releases because the Layers panel and Properties panel have not changed much.
Pick a photo you know well, ideally a RAW file or a straight-out-of-camera JPEG. A portrait with obvious shadows and highlights teaches masking better than a flat, evenly lit product shot.
Two things about the interface differ between platforms, and knowing them now saves confusion later:
- Menu paths. On Windows the menu bar sits along the top of the screen; on macOS it sits at the very top of the display, above the Photoshop window. The menu names are otherwise identical, so Layer > New Adjustment Layer > Brightness/Contrast is the same click on both.
- Modifier keys. Windows uses Ctrl for commands and Alt for options. macOS uses Cmd and Option. Wherever this guide names a modifier, both versions appear.
You should also know your way around the Layers panel, because that is where adjustment layers live. The Layers panel shows layers top to bottom, with the topmost layer sitting on top of the image. The small icons along its bottom edge include the half-filled circle that creates a new fill or adjustment layer, and the eye icon at the far left that toggles any layer on or off.
If the Properties panel is not visible, open it from the Window > Properties menu. That panel is where the sliders for your adjustment will live once the layer exists.
Step-by-Step: How to Use Adjustment Layers in Photoshop
Here is the complete non-destructive workflow. Your original image layer never changes, and every correction you make sits above it as a separate, editable layer that you can mask, reorder, rename, or delete at any point. Clipping masks, layer masks, Smart Objects, blending modes, and grouping all come later in the process, once you are comfortable with a single adjustment.
1. Open the Image and Check Its Document Type
Open your file with File > Open (Ctrl+O on Windows, Cmd+O on Mac). A JPEG typically opens with a single locked layer named Background, which is normal. A RAW file opens in Camera Raw first: set the develop settings you want, click OK, and the result arrives in the main workspace as a Background layer.
Before you adjust anything, decide whether you want flexible edits later. If you do, right-click the Background layer and choose Layer > Smart Objects > Convert to Smart Object (earlier versions call it New Smart Object from Background). The layer gains a small Smart Object badge in its corner, and any destructive adjustment you do apply inside it can be reopened and changed. Our guide to how to use Smart Objects in Photoshop covers the rest.
You will know the conversion worked if the layer thumbnail sits at the top of the Layers panel and can be dragged freely without affecting any layer below it.
2. Add Your First Adjustment Layer
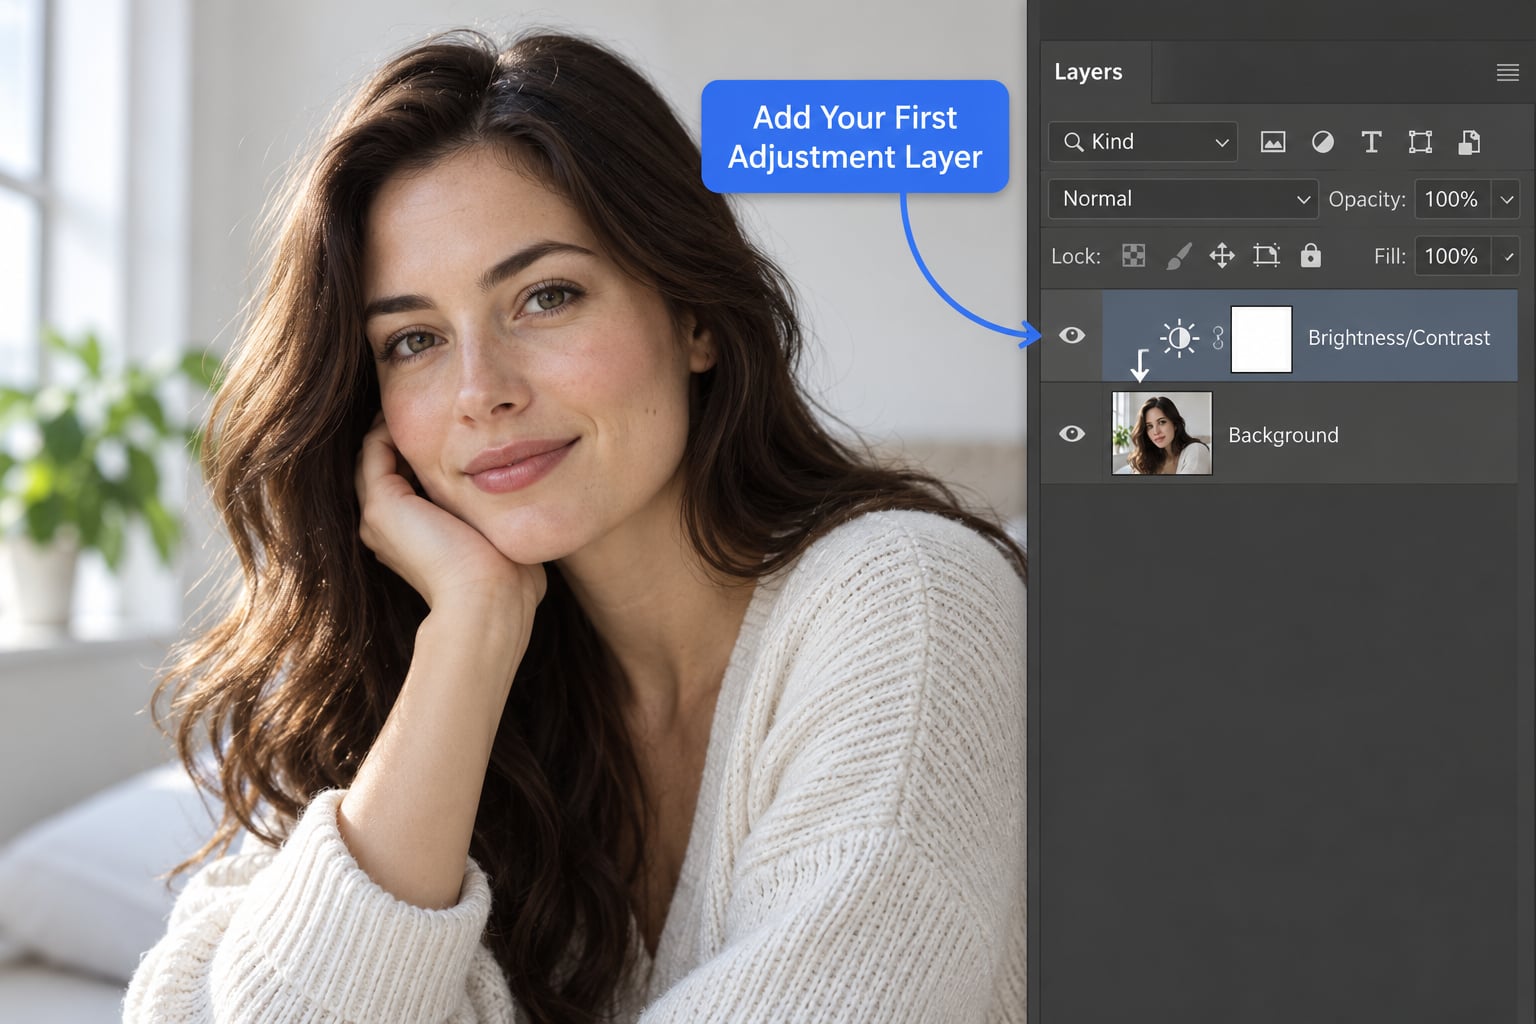
There are three ways to add one, and they all produce the same layer.
- Layers panel icon. Select your image layer, then click the half-filled circle at the bottom of the Layers panel (Create New Fill or Adjustment Layer). Choose Brightness/Contrast from the list.
- Menu path. Use Layer > New Adjustment Layer > Brightness/Contrast. This is the clearest path to read out loud while you are learning, and it works identically on both platforms.
- Presets. With your image layer selected, open the Properties panel, click the small preset menu at its bottom edge, and pick a starting point from groups such as portraits, photo repair, creative, black and white, or cinematic. A preset is just a pre-built stack of adjustments, which is a fast way to see how several layers cooperate.
The new layer appears directly above whichever layer was selected, with a white layer mask thumbnail beside its adjustment thumbnail. That white mask means the effect is fully visible everywhere. If the new layer is indented and a small downward arrow sits on the line between it and the layer below, it is clipped, meaning it affects only that layer.
That arrow is the single most useful indicator in the whole panel. Learn to read it before you learn anything else about layers.
3. Make a Strong Adjustment, Then Refine It
Start gentle. Type small values first, such as Brightness at plus 10 and Contrast at plus 10, then push further only while you watch the image. Large jumps on the first drag are the fastest way to convince yourself that adjustment layers are not working well.
Watch two things while you adjust. The Info panel and the histogram tell you when shadows clip to pure black or highlights clip to pure white, and clipped pixels are gone forever. And the properties panel has a Use Legacy checkbox for Brightness/Contrast; leave it off for modern tonal work because the legacy algorithm tends to shift color as it darkens.
When an adjustment overshoots, fix it with a different layer rather than pushing back on the same slider. Highlights that blew out come back with a Curves layer rather than more negative contrast. Skin that went orange after a saturation boost comes back with Vibrance set below zero, or with a targeted Hue/Saturation layer. Stacking corrections this way is what separates a rough edit from a clean one.
4. Paint the Adjustment with a Layer Mask
Black conceals and white reveals on a layer mask, so painting black on the mask hides the adjustment wherever you brush. Select the white mask thumbnail beside the adjustment, not the adjustment thumbnail itself. Set your foreground color to black, pick the Brush tool, and use a large soft round brush at roughly 40 percent opacity.
Soft matters. A hard-edged brush leaves a visible border, and a high opacity leaves you with nowhere to ease off. Two or three light passes build a smoother result than one heavy one.
To see what you are painting, hold Alt on Windows or Option on Mac while clicking the mask thumbnail. The rest of the document greys out and the mask shows on its own, which makes it obvious where you have already been.
You will need the reverse often, so learn these too. Select the mask and press Ctrl+I (Cmd+I) to invert it, turning black into white. Use Layer > Layer Mask > Hide All to start from a fully black mask and paint white where you want the effect, and Reveal All to reset to fully white. Holding Shift while clicking a mask switches it off temporarily without deleting anything.
5. Combine Several Adjustments in a Logical Stack
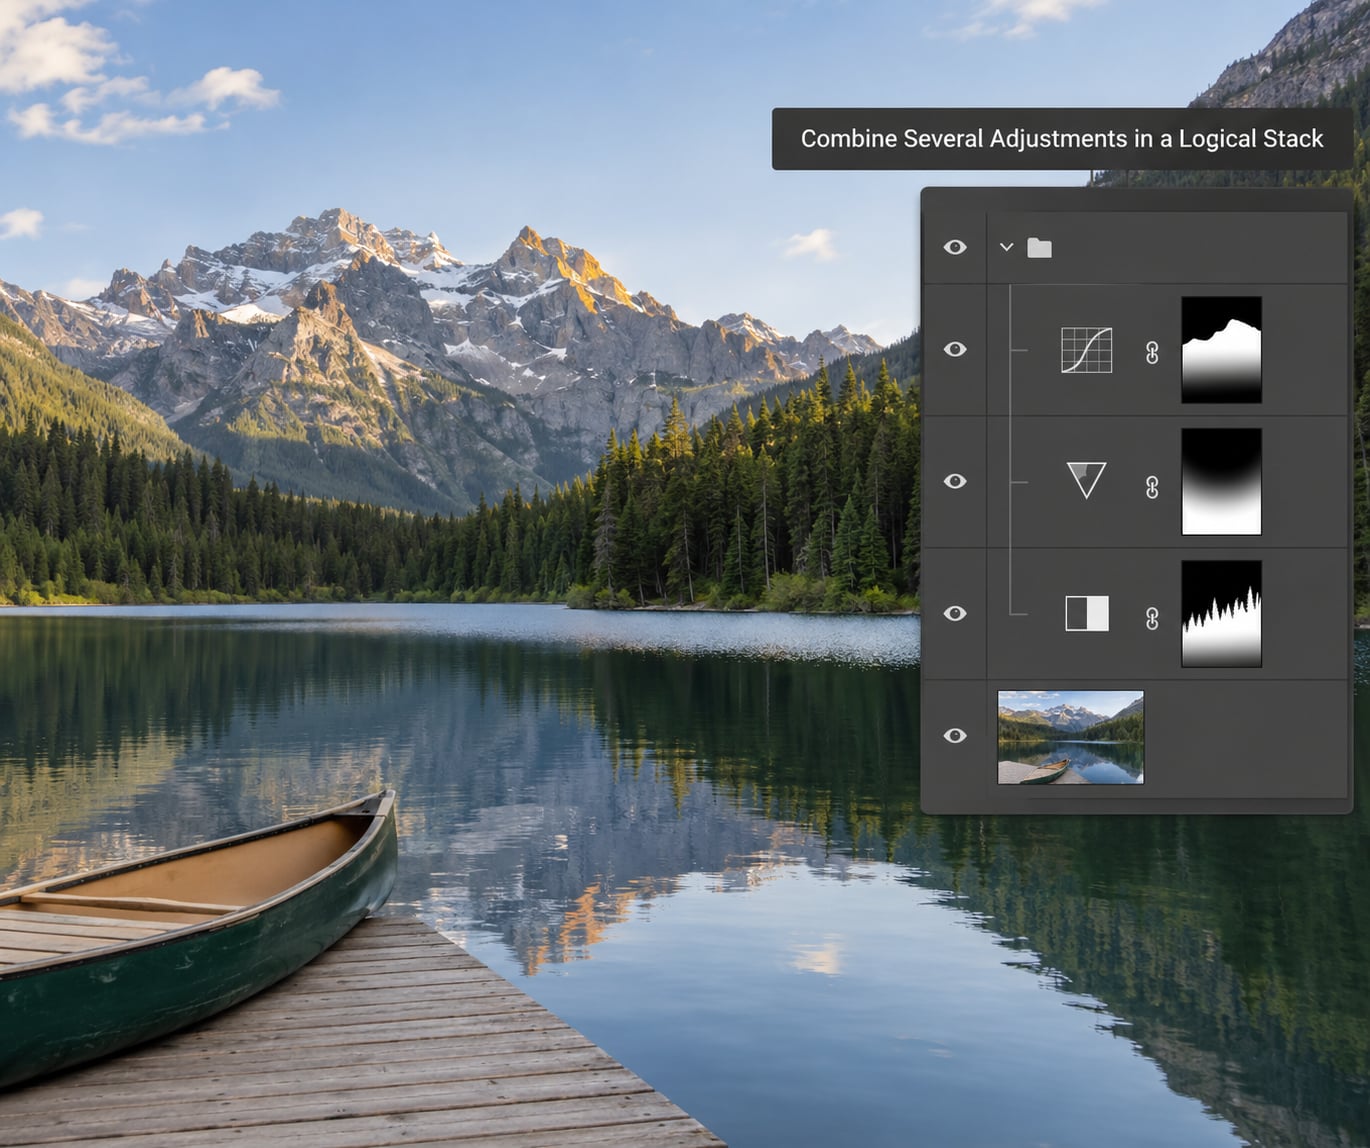
One adjustment cannot fix a photograph. Real edits use a small stack, and the order below is the one I default to because each layer has a single job.
- Exposure or Levels for the overall brightness and the black and white points.
- Curves for contrast and tonal shaping, once the rough exposure is right. Our how to use Curves in Photoshop guide walks through the panel in detail.
- Color Balance to remove a color cast, or Hue/Saturation for a global shift.
- Vibrance to add or pull back saturation gently, with skin tones protected.
- Black & White or Gradient Map last if you are converting the image. Our guide to the Black and White adjustment layer explains the channel sliders.
- Selective Color for targeted correction, then dodge and burn on a soft light layer as the finishing move.
Once the stack works, keep it tidy. Double-click a layer name to rename it to something meaningful, and press Ctrl+G (Cmd+G) to group related adjustments together. A named, grouped stack is far easier to reopen and adjust six months later than eight layers called Layer 1 through Layer 8.
Recent versions of Photoshop also include a Light adjustment layer aimed at relighting a subject, which is worth a look if your shadows are the problem rather than your tone. If it does not appear in your Layer > New Adjustment Layer menu, your version predates it.
6. Adjust Only Part of the Image
A clipping mask restricts an adjustment to the layer directly below it. Select the image layer, then hold Ctrl on Windows or Cmd on Mac and click the half-filled circle in the Layers panel. The adjustment is created already clipped, and the downward arrow confirms it.
The other route is to drag the adjustment layer until its pointer becomes a small curved arrow, then Alt-click (Option-click on Mac) on the line between the two layers. Both methods do the same thing.
Two details catch people out. First, a clipped adjustment affects all the layers collected underneath it, not just the one you clicked, so a stack of three clipped adjustments behaves as a group. Second, clipping to a layer with no pixel content does nothing at all, which is why a clipped adjustment above an empty transparent layer seems to do nothing when you look at the canvas. It is working, just on nothing.
Use a standalone masked layer instead when the effect needs to reach several non-adjacent layers, or when you want to see the adjustment over other content such as text or a second photo. Clipping is for one subject; masking is for a region.
7. Change the Effect Without Redoing the Edits
This is where the workflow pays off. Click the eye icon to see the before and after, then click it again. Drag an adjustment layer up or down the stack to change the order, and drop the opacity below 100 percent to soften an effect that reads too strongly.
Blend modes reshape a correction without touching the sliders. Soft Light and Overlay are gentle contrast and color tools, Multiply darkens and deepens, Vivid Light pushes saturation and contrast hard, and Difference or Exclusion is a diagnostic: set an adjustment to Difference and everything it is not affecting turns black, which shows you the exact footprint of the effect.
For a softer boundary, double-click the adjustment layer thumbnail to open Blending Options, then work with the Blend If sliders. Shift-click to add a second slider, drag with Alt or Option held down to split it into a feathered range, and Alt-click or Option-click the mask thumbnail first if you want the mask to drive the range instead of the tones.
If you want the same correction in a different place in the file, select the adjustment and press Ctrl+J (Cmd+J) to duplicate it, then drag the copy where you need it.
8. Save and Reopen the Editable File
Use File > Save As and keep the Photoshop format, either .psd for normal files or .psb for very large ones. Choosing Keep Current Format when prompted keeps the layered, editable version intact.
Adjustment layers only exist in the PSD or PSB. Export for the web with File > Export > Export As (Ctrl+Alt+Shift+W on Windows, Cmd+Shift+Option+W on Mac), which creates a flattened copy for the web while your working file keeps every layer live.
If you prefer to bake changes deliberately, open Image > Flatten Image on a duplicate first, never on the file you are still working in. Flattening merges every visible layer into one and merges your adjustment into your pixels, which is exactly the loss of control adjustment layers exist to prevent.
Common Mistakes
Most of the frustration beginners report with these layers comes down to a handful of specific habits. Each one has a quick fix.
Deleting the Mask Instead of the Adjustment Layer
Clicking an adjustment layer selects whichever thumbnail you clicked, and the mask sits right next to it. When you press Delete, you may be removing the mask rather than the whole layer, which leaves a mysterious second adjustment behind. Click the adjustment thumbnail so its border is highlighted, press Delete, and confirm the mask thumbnail disappears with it.
The Adjustment Affects Every Layer Below It
That is default behaviour, not a bug. An unclipped adjustment layer applies to everything beneath it in the stack. If you meant it for one layer only, add it with Ctrl or Cmd held down so it is created clipped.
Clipping to a Layer With No Pixels
A clipped adjustment needs pixel content underneath. Clip it to the empty layer above your photo and the change is real but invisible. Check for pixel content by Alt-clicking the layer’s thumbnail to isolate it, or simply clip to the visible photo layer instead.
Painting on the Adjustment Instead of the Mask
Painting with the adjustment thumbnail selected does nothing visible, because the thumbnail is not a canvas. Click the black-and-white mask thumbnail, confirm your foreground color is black, and paint.
Stacking Fifteen Adjustments at Full Opacity
Each layer adds a little, and the result turns muddy and heavy. Group related adjustments, drop the group opacity to somewhere between 60 and 90 percent, and delete any layer that is doing almost nothing.
Flattening Out of Habit
Flattening feels tidy and it is exactly the wrong instinct. Keep a layered PSD as the master file, and flatten only a duplicate at export time.
Photoshop Pauses While You Drag
Every adjustment layer makes Photoshop recompute the stack above your image, so a large file with many masked layers will feel slow. Convert your base image to a Smart Object, close layers you are not working on, work at a lower zoom, and save a smaller working copy while you iterate.
Adjustment Layers vs. Image > Adjustments
The Image > Adjustments menu changes the pixel data of the selected layer permanently. An adjustment layer stores the same settings separately and reapplies them on top of the image. For anything you might revisit, the adjustment layer is the right tool.
| Factor | Image > Adjustments | Adjustment Layer |
|---|---|---|
| Effect on pixels | Baked into the layer, permanently | Applied on top, pixel data untouched |
| Reversible | Only by history while the session runs | Any time, by changing or removing the layer |
| Editable later | No, values are gone | Yes, sliders stay live |
| Scope | Selected layer only, and it is ruined | All layers below, or one layer when clipped |
| Selective control | None | Layer mask, brushable at any resolution |
| Compare on and off | Not possible | Click the eye icon |
There is one honest exception. If you are correcting a large batch of files that will never be revisited, the Image > Adjustments menu is faster and the file is smaller. For a photograph you care about, use adjustment layers.
Layer Mask vs. Clipping Mask
These two get confused more than anything else in the Layers panel, and they do completely different jobs. A layer mask is a paintable grayscale map you control by hand. A clipping mask is a switch that changes which layers an adjustment is allowed to touch.
| Factor | Layer Mask | Clipping Mask |
|---|---|---|
| What it limits | Where in the image the effect appears | Which layers the effect reaches |
| How it is made | Automatic when an adjustment is created | Ctrl or Cmd plus the adjustment icon, or Alt-click between layers |
| How you edit it | Select the mask thumbnail and paint | You do not edit it; toggle the arrow or the indentation |
| Visual clue | Black and white thumbnail | Downward arrow and indented layer |
| Typical use | Darkening a background, dodging a face | Sharpening or color-correcting one photo in a composite |
They also combine. Clipping an adjustment limits it to a layer, and adding a layer mask to that clipped adjustment then limits it further to part of that layer.
Blend Modes for Adjustment Layers
The blend mode is the cheapest way to change how strong an adjustment feels. Double-click the layer thumbnail to reach these settings, or set the mode from the drop-down at the top of the Layers panel.
| Blend mode | What it does to an adjustment | Reach for it when |
|---|---|---|
| Normal | Applies the full effect as set | You want predictable, exact values |
| Soft Light | Applies the effect gently | Subtle contrast or color shifts |
| Overlay | Stronger contrast with more bite | Punchy textures and skies |
| Multiply | Darkens only, never lightens | Deepening shadows and backgrounds |
| Vivid Light | Extreme contrast and saturation | Dramatic, high-impact grading |
| Difference | Inverts where the effect does not reach | Diagnosing the footprint of an adjustment |
| Exclusion | A softer version of Difference | Same diagnosis with less harshness |
Adjustment Layer Shortcuts for Windows and Mac
These are the ones worth memorizing. Everything else can be clicked.
| Action | Windows | Mac |
|---|---|---|
| Reveal All on a layer mask | Shift+click the mask icon | Shift+click the mask icon |
| Hide All on a layer mask | Alt+click the mask icon | Option+click the mask icon |
| Group selected layers | Ctrl+G | Cmd+G |
| Add a layer clipped to the selected layer | Ctrl+click the adjustment icon | Cmd+click the adjustment icon |
| Create a clipping mask by dragging | Alt-click between layers | Option-click between layers |
| Invert a layer mask | Ctrl+I | Cmd+I |
| Duplicate the selected layer | Ctrl+J | Cmd+J |
| View the mask alone | Alt+click the mask | Option+click the mask |
| Toggle layer visibility | Ctrl+click the eye icon | Cmd+click the eye icon |
Frequently Asked Questions
What are adjustment layers in Photoshop?
An adjustment layer is a layer that applies color or tonal changes to the image beneath it while leaving the original pixel data alone. Brightness, contrast, curves, vibrance, black and white, and color balance all exist as adjustment layers. Because the change is stored separately, you can reopen the sliders at any time, switch the effect off with the eye icon, or delete it and return to the untouched photograph.
Should I use adjustment layers or edit the image directly?
Use an adjustment layer whenever you might revisit the file. The Image Adjustments menu writes values straight into the pixels of the selected layer, and the only way back is the history stack while your session is still open. Adjustment layers cost a fraction of a second each and keep every value live. The only time the direct menu makes sense is a large batch of images that will never be opened again.
How do I make an adjustment layer affect only one area?
Paint on its layer mask. Select the white mask thumbnail beside the adjustment, set the foreground color to black, and brush with a soft round brush. Black hides the adjustment, white reveals it, and grey applies it partially. Press Ctrl+I on Windows or Cmd+I on Mac to invert the mask when you want the opposite, or start from a black mask with Layer Layer Mask Hide All and paint white instead.
Why is my adjustment layer grayed out?
It is grayed out because the layer is turned off, not broken. Click the eye icon at the far left of that row to switch it back on. A second cause is a selected background layer with a locked transparency setting above it, or an adjustment sitting inside a hidden group. Look for a closed folder icon next to your layer and open it. Grayed-out text in the Layers panel always means visibility, never a broken file.
Can adjustment layers be exported as separate files?
No. An adjustment layer has no image content of its own, so it cannot be exported or saved on its own the way a photo layer can. What you can do is export a flattened JPEG, PNG, or TIFF, which bakes every adjustment into the pixels of that exported file. To get the look on its own, duplicate the document, flatten the duplicate, and export that, leaving your layered master file untouched.
How many adjustment layers should I use?
Enough to do the job, and no more. A typical finished edit uses five to eight: exposure or levels, curves, color balance or hue and saturation, vibrance, a black and white or gradient map if converting, selective color, and a final dodge and burn. If two layers are doing the same thing, combine them by dropping opacity. Group the stack and lower the group opacity to around 80 percent to keep the result clean.
Start with one Brightness/Contrast adjustment layer. Push the values, click the eye icon to compare, then select the white mask and pull the effect out of the sky with a soft black brush. Once that feels natural, add a Curves layer beneath it and a Vibrance layer above it, and you have the start of a real edit.
Save as PSD before you go further, and keep every layer named. The habit that makes adjustment layers worth learning is saving the master file, not the flattened export, and leaving every value open for the next time you open the photograph.