

To fix overexposed photos in Lightroom, lower the Exposure slider a stop at a time, then pull the Highlights slider down until detail returns, and finish with masking for whatever is still blown. RAW files give you real recovery room. Fully clipped white pixels in a JPEG do not come back, no matter which slider you touch.
That is the honest version. Plenty of shots that look ruined on the back of the camera are recoverable, and plenty are not. The difference usually comes down to two things: whether you shot RAW, and whether the bright area actually hit the sensor ceiling or merely sat close to it.
What follows is the order I use. Exposure first, highlights second, then the shadow end so the picture does not go flat, then a curve and a mask for the stubborn bits. Every edit is non-destructive in Lightroom, so you can always put a slider back to zero.
Table of Contents
- What You Need
- Step-by-Step: How to Fix Overexposed Photos in Lightroom
- 1. Check the Histogram and Identify the Clipped Areas
- 2. Lower the Overall Exposure Carefully
- 3. Recover Highlights and Whites
- 4. Adjust Shadows, Blacks, and Contrast
- 5. Use the Tone Curve for Finer Highlight Control
- 6. Mask Specific Areas That Still Look Blown Out
- 7. Compare, Refine, and Export the Corrected Photo
- Common Mistakes
- Frequently Asked Questions
- Can overexposed detail actually be recovered in Lightroom?
- Is RAW really much better than JPEG for fixing overexposure?
- How much should I reduce the Highlights slider?
- Can Lightroom fix whites that are completely blown out?
- Why does my corrected photo look dark and grey?
- Can I fix overexposed photos in Lightroom mobile the same way?
- Conclusion
What You Need
You need the original file, not a copy exported from a phone or a social app. Import it into your Lightroom Classic catalog and open the Develop module. If you shoot JPEG only, work through the same steps but expect the ceiling to be much lower.
Three shortcuts save real time. Press J to switch the histogram into clipping display, where solid white or black at the end of a bar means lost data. Press O to toggle a mask overlay so you can see exactly what a mask is selecting. Press K to jump to the adjustment brush.
A calibrated or at least neutral display matters more here than in most edits. Overexposure correction is a judgment about brightness, and a dim laptop panel will push you to over-darken. Give yourself twenty quiet minutes. Rushed exposure work is why so many recovered shots end up looking grey.
Step-by-Step: How to Fix Overexposed Photos in Lightroom
Seven steps, in this order. The goal is usable detail and tonal separation, not turning every bright area into mid-grey. A window that reads as slightly hot looks more convincing than a window forced to 18 percent grey.
1. Check the Histogram and Identify the Clipped Areas

Start in Develop module with the Histogram panel switched on, then press J. The panel turns black, and any area that renders as flat white or flat black at the outer edge has no recoverable data left in it.
Watch which colour clips first. A red channel that runs out turns skin yellow or green once you pull exposure back, because green and blue are still doing work while red has nothing left. That changes your approach, and it is worth two seconds of attention before you move any slider.
A peak touching the far edge is a warning, not a verdict. If the highlight is a thin strip, you are usually fine. If it covers a whole face or the entire sky, expect grey or flat colour no matter how far you push.
2. Lower the Overall Exposure Carefully
Work in quarter-stop increments. Hold Alt (Option on Mac) while dragging to bypass the step size, or use the top of the Develop panel for exact numbers.
Stop lowering exposure the moment the important detail appears, not when the image stops looking bright. Going further just darkens everything, including the parts that were already correct, and you will spend step 4 undoing it.
Zoom in at 100 percent and look at the edge that matters: a wedding dress hem, a horizon line, the whites of an eye. If you cannot see separation there, one more small step is justified. Usually between -0.30 and -0.80 is the useful range for a moderately blown frame.
3. Recover Highlights and Whites
Highlights comes before Whites, always. Highlights works on a wide range of bright tones and protects edge detail; Whites grabs only the very brightest points and shifts where the image considers white to be.
Drag Highlights down until the histogram stops hitting the wall. For moderate overexposure, -30 to -60 is a typical starting range. For severe cases, take it all the way to -100 first, find out what is actually in there, then bring it back up to where it looks right.
Whites follows, gently. -10 or -20 usually closes the last bit of hotness without dulling the subject.
| Situation | Exposure | Highlights | Whites | Shadows |
|---|---|---|---|---|
| Mild, highlights just hot | 0 to -0.30 | -20 to -40 | 0 to -10 | 0 to +10 |
| Moderate, a face or sky is clipping | -0.30 to -0.80 | -50 to -80 | -10 to -25 | +15 to +35 |
| Severe, large white area | -0.80 to -1.50 | -100 first, then ease back | -20 to -40 | +30 to +60 |
| Backlit subject, bright background | 0 to +0.30 | -60 to -100 | -10 to -30 | +40 to +70 |
These are starting points, not answers. The histogram decides, and the subject decides faster.
4. Adjust Shadows, Blacks, and Contrast
Dropping exposure darkens the whole frame, so the shadow end now needs a small lift. Shadows up until faces and clothing regain shape, then stop before the picture looks hazy.
Blacks set the floor. Pull them down a little to restore depth, but keep an eye on the clipping indicator at the bottom of the histogram, because crushing shadows creates the same unrecoverable problem you started with.
Touch Contrast, Texture and Clarity only if the image needs it. A small amount of Texture plus Clarity inside a mask can give recovered highlights the micro-contrast they lost, which reads as detail rather than noise when the grain size stays fine.
For the wider tonal story once exposure is stable, our guide to how to color grade photos in Lightroom picks up where this leaves off.
5. Use the Tone Curve for Finer Highlight Control
Reach for the Tone Curve when the sliders have given you detail but the transition still looks abrupt, or when you want to protect skin tones while pulling the sky down.
The point curve shows four regions. Black point at the far lower end, shadows next, midtones around the centre, and the highlight shoulder at the upper right where anything above roughly 75 percent brightness lives.
Drop a point in the shoulder and pull it gently downward. A small drag does a lot; the shoulder is steep, so a minor move changes a wide band of tones. Then use the Region buttons below the curve to restrict your edit to highlights only, which keeps midtone colour from shifting with it.
Never lift the whole curve. Doing so raises everything and puts you back at step 2 with less control. And if the curve starts making tiny hard edges along the shoulder, add a point and soften the transition instead of pushing harder.
6. Mask Specific Areas That Still Look Blown Out
Global sliders fix the image as a whole. Once a wall, window or sky is still hot while the rest looks right, you are in masking territory.
Press U to bring up Select Subject, Select Sky or Select Objects, or K for the brush. Select Sky handles most bright backgrounds. For windows and reflective surfaces, the adjustment brush with a low exposure and generous feather usually beats an AI selection.
Press O while you work and the overlay shows you the actual mask. Invert with Alt and click if you grabbed the wrong side, extend it with Shift, and add a little Shift plus a bracket over stray areas to subtract.
Inside the mask, drop exposure and highlights slightly, pull Whites down, then add a small amount of Dehaze to a blown sky. Dehaze cannot bring back pixels that never existed, but it often reveals blue that was hiding just under the clipping point. That combination, Dehaze plus a touch of Texture, gets more out of a flat sky than any global move.
For graduated transitions near a horizon, the graduated filter still beats a sky mask because its falloff is gradual.
7. Compare, Refine, and Export the Corrected Photo
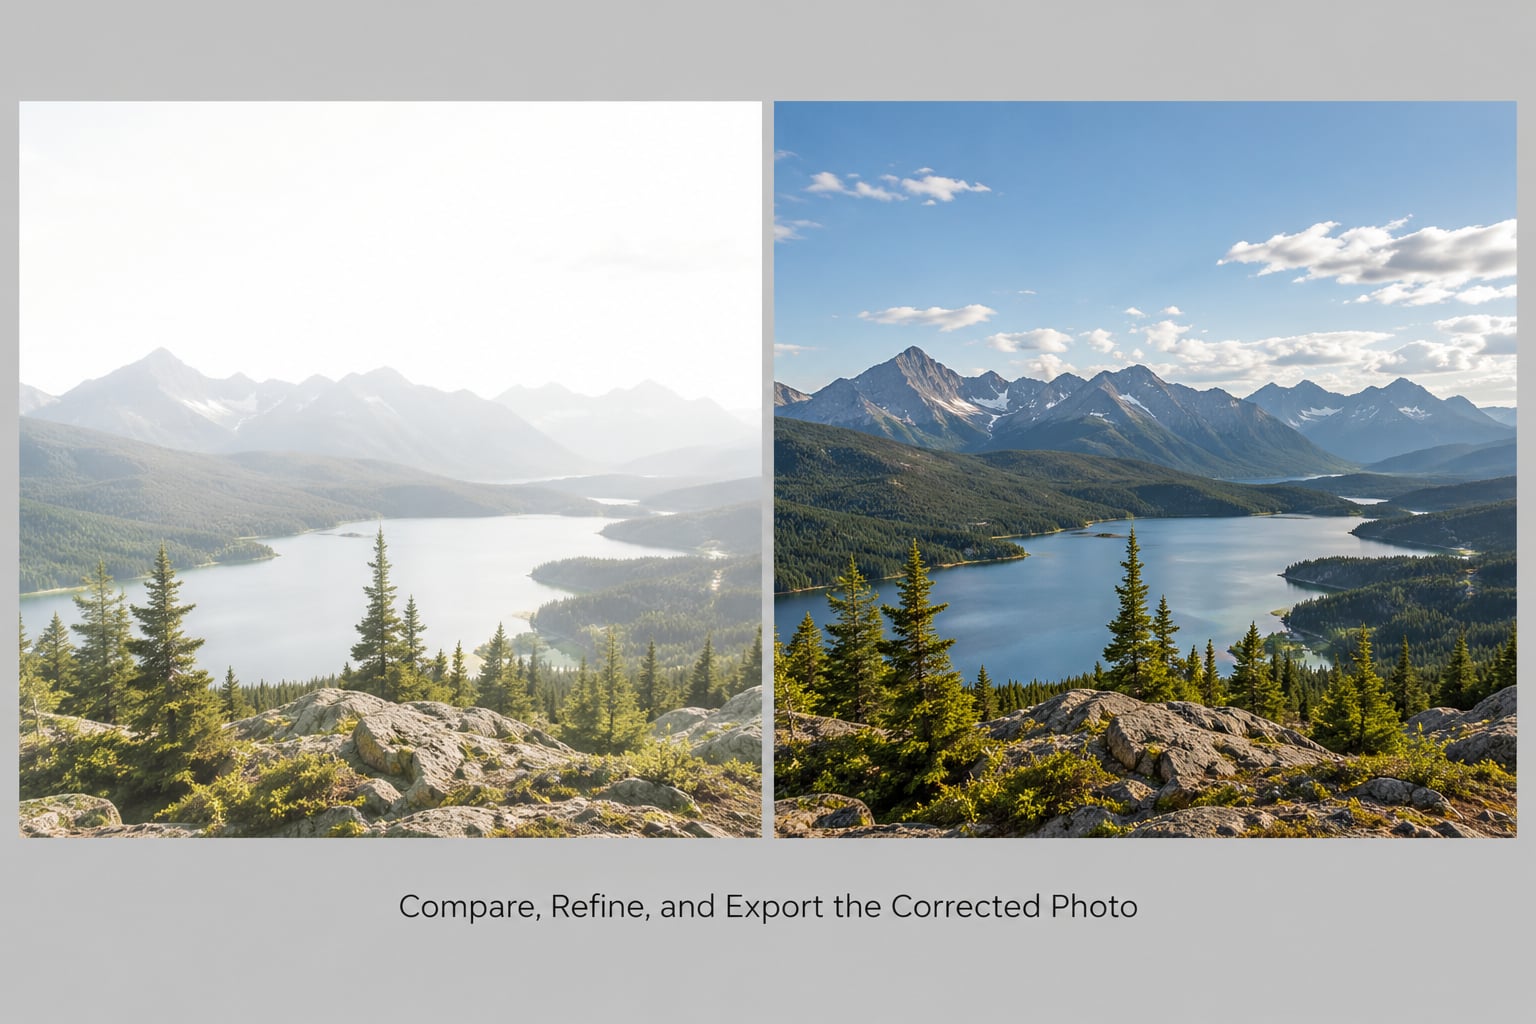
Hold Backslash to see the before and after side by side, and toggle clipping one more time to confirm the bright areas have stopped stacking at the edge. Then zoom into the sharpest edge in the recovered region and check for banding.
Work out whether the corrected file still works in colour and in black and white. If the recovered region is grey and lifeless, a monochrome conversion often makes it stronger than the colour version ever was, and the full method is in our guide to how to edit black and white photos in Lightroom.
Export a full-size JPEG for delivery, and keep the RAW file in your catalog for later. If this frame is one of a series, our how to organize photos in Lightroom workflow covers collections and virtual copies so the original file stays untouched.
Common Mistakes
Pushing Exposure too far. If the midtones feel heavy and lifeless, you went one step past useful. Go back by quarter stops until contrast returns.
Using Whites before Highlights. Whites shifts the definition of white and can dull the image. Highlights does the recovery work, and Whites only tidies up afterwards.
Lifting Shadows until the frame goes flat. Shadows should restore shape, not fill the frame with haze. If blacks no longer read as black, stop lifting.
Expecting Dehaze to fix clipping. Dehaze adds contrast to what is there. On fully clipped areas it produces a flat grey or an unnatural edge. Mask it and keep it small.
Masking the wrong region. Turn on the overlay with O before you touch a single slider. Most bad local adjustments are wrong masks, not wrong numbers.
Judging at thumbnail size. The Library grid lies about both exposure and colour. Judge in Develop at 100 percent.
Copying slider values across a whole set. The starting values above are a baseline. Each frame clips at a different point, so check the histogram every time.
Some shots are beyond help, and recognising that early saves an afternoon. If a white area is large, flat and featureless with clipping confirmed in all three channels, cull it.
Prevention is the better fix. Shoot RAW, use zebra stripes or the highlight alert on your camera, expose to the right as far as the histogram allows, and bracket when the scene contains both a bright sky and a dark interior. A neutral density filter or a polarizer solves more exposure problems at the capture stage than any slider.
Frequently Asked Questions
Can overexposed detail actually be recovered in Lightroom?
Partly, yes. Pixels that sit near but below the clipping point still hold real data, and Lightroom can pull them back with Highlights and a gentle curve. Pixels at the maximum value are set to the same number no matter what the light was, so that detail is gone permanently. Check clipping with the J key before you spend time on a frame.
Is RAW really much better than JPEG for fixing overexposure?
Yes, and the gap is wide. A RAW file stores 12 to 14 bits per channel, so highlights that would clip early in an 8-bit JPEG still hold recoverable data. Photographers consistently recover more sky and skin detail from RAW than from a JPEG shot at the same settings. The workflow is identical either way, only the ceiling is higher.
How much should I reduce the Highlights slider?
For moderate overexposure, -30 to -60 is a sensible range. For severe cases, drag Highlights to -100 first to see whether any structure exists at all, then ease it back to where the image looks natural. The number matters far less than the histogram. If the bars are still hitting the right edge, there is more to pull.
Can Lightroom fix whites that are completely blown out?
No. When every channel in a region has hit its maximum, that area carries no information and no slider can invent it. Lightroom can only darken a blown area so it stops distracting from the rest of the frame, or you can crop it out or convert the frame to black and white. Some photos really are beyond repair.
Why does my corrected photo look dark and grey?
That is usually overcorrection plus too little shadow lift. Lowering exposure too far flattens the midtones, and pulling blacks down afterwards removes the contrast that gives the image depth. Reset to defaults and work again in quarter stops, then raise Shadows only as far as the shape of the subject requires.
Can I fix overexposed photos in Lightroom mobile the same way?
The core sliders, the tone curve and Select Subject and Select Sky all work in the mobile app, so most of this workflow applies. The differences are in the finer tools: Lightroom Classic offers more masking options, adjust brush feathering controls and point-curve region work. For a complicated frame, do the heavy edits on the desktop.
Conclusion
To fix overexposed photos in Lightroom, four actions do most of the work: press J and see what actually clipped, lower Exposure in quarter stops until the important detail shows, pull Highlights down until the histogram stops hitting the edge, then lift Shadows just enough to give the frame its shape back.
Everything after that is refinement. A curve for the shoulder, a mask for the sky or the window, a little Dehaze and Texture on a masked sky, and then a check with Backslash before you export.
Save the result as a virtual copy or a new version rather than overwriting. Lightroom edits are non-destructive, and you will want to revisit these frames once you know how you want the final series to look.