
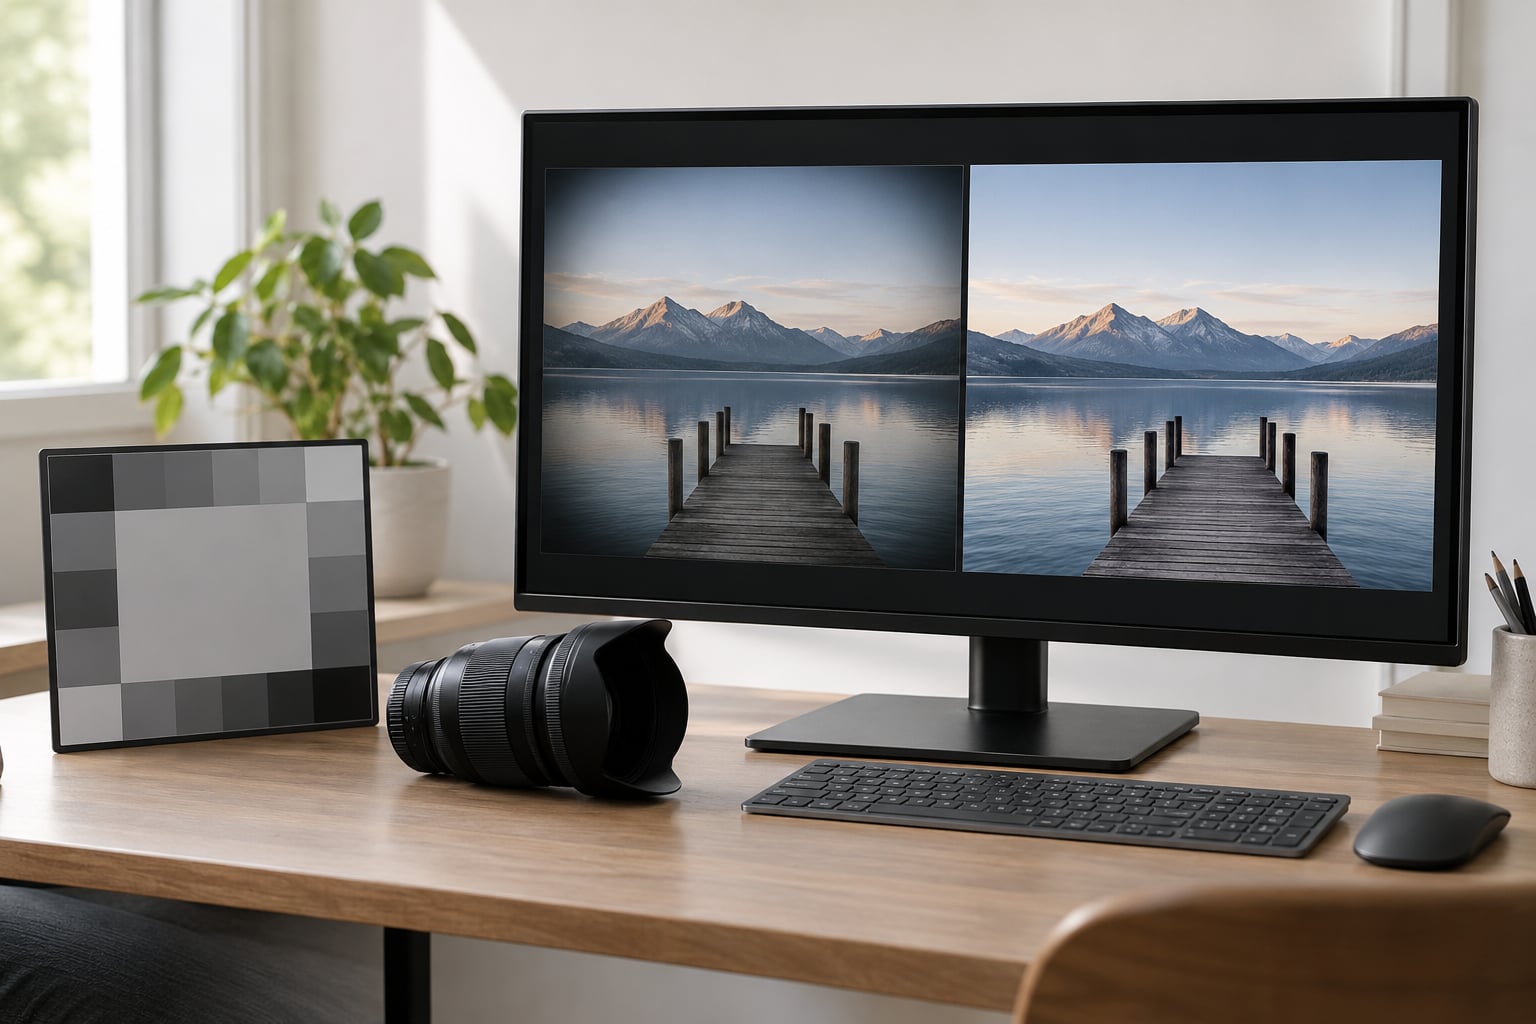
Vignetting is the gradual darkening of a photo’s corners and edges compared with its centre, caused by the lens failing to deliver equal light to every part of the frame. You fix it by brightening the corners until they match the centre, using a lens profile where one exists and a manual mask where one does not.
This guide covers removing vignetting. Adding a dark edge on purpose is a different job, and most of the video results you’ll find for this query actually show the creative version. Everything below is about getting the corners back to where the centre already is.
Time needed: about two minutes per image in Lightroom or Photoshop once you know which corner is at fault. The harder part is diagnosis, not the slider.
Table of Contents
- What You Need
- Step-by-Step: How to Fix Vignetting in Photos in Six Steps
- 1. Check Whether the Dark Corners Are Vignetting
- 2. Correct the Problem at the Camera When Possible
- 3. Fix Vignetting in Lightroom With the Profile Corrections Panel
- 4. Fix Vignetting in Lightroom With the Radial Filter
- 5. Fix Vignetting in Photos in Photoshop or GIMP
- 6. Fine-Tune and Export the Corrected Photo
- Common Mistakes
- Frequently Asked Questions
- Conclusion: Start With the Least Invasive Fix
What You Need
You need the original file, not a copy saved back over it. A RAW file gives you the most room, because the correction happens on data the camera recorded before any in-camera processing was baked in. A JPEG can still be corrected, but you are lifting pixels that have already been sharpened, compressed and tone-mapped.
Next you need an editor. The exact path changes with the app, so pick whichever you already own:
- Lightroom Classic — Develop module, Profile and Optics panels, plus the Radial Filter for manual work.
- Photoshop — the Camera Raw Filter, which opens the same lens correction tools as Lightroom.
- Lightroom (web) and Lightroom Mobile — the panel is called Optics and the controls are fewer.
- Free options — darktable, RawTherapee, GIMP and DxO PhotoLab all have vignetting controls, and darktable and RawTherapee are genuinely capable rather than an afterthought.
Two small habits make the rest easier. Set your monitor brightness to match the room you’re working in, and learn to view the image at 100% rather than fitted to the screen. Vignetting hides at thumbnail size and announces itself the moment you zoom in.
Before you edit anything, decide whether the dark corners are even a defect. A vignette you added deliberately in an earlier edit, a studio backdrop that falls off toward the edges, or a scene where the subject sits in a pool of light are all doing the job you asked them to do. Chasing those with an Amount slider gives you a flatter image and a worse photograph. This guide walks through checking for that first.
Step-by-Step: How to Fix Vignetting in Photos in Six Steps
1. Check Whether the Dark Corners Are Vignetting
Vignetting has a recognisable shape: the brightness falls off smoothly and symmetrically toward the edges, and all four corners are affected in roughly the same way. Turn on the clipping warnings in the Lightroom Develop module, or hold the alt key while viewing the histogram in Photoshop, and check whether the corners are sitting in the shadows or pushed into the blacks.
Then look at all four corners rather than the one that bothered you. Real optical vignetting follows the frame. If only one corner is dark, the cause is almost certainly something else, such as a light stand, a finger near the mount, or a hood that is blocking that side only.
Reviewers on photography forums describe the same diagnostic step over and over: take the hood and any filters off, shoot one frame, and compare it with a frame taken with everything on. If the dark corners vanish, the problem was mechanical, not optical, and no amount of editing is the right answer.
You know the check passed when the corners are measurably darker than the frame needs for your subject, rather than simply shaped like a vignette. A flat grey wall photographed head-on is the clearest test case: any darkening you see there is a fault.
2. Correct the Problem at the Camera When Possible
Natural vignetting eases noticeably as the aperture narrows, so stopping down one or two stops is often the cheapest fix available. If you shoot a frame at f/2 and another at f/5.6 against the same flat subject, the difference in the corners will usually settle the question.
Check the physical stuff before you blame the glass. An unscrewed light baffle or a slightly loose internal element produces vignetting that looks like a lens design problem and is not one, and that has come up more than once in discussions on r/AnalogCommunity. Take the hood off and shoot without filters before deciding the lens is at fault. If you rely on ND filters for long exposures, this matters — the guide to using a neutral density filter covers how stacking and thick glass darken the corners.
A repeating frame is the verification. Shoot the same test twice with the setup changed and confirm the corners retain more even light before you commit to a correction workflow.
3. Fix Vignetting in Lightroom With the Profile Corrections Panel
In Lightroom Classic, go to Develop, open the Profile panel, tick Enable Profile Corrections, and confirm that Remove Chromatic Aberration is also ticked. Lightroom reads the EXIF metadata, matches the lens and camera combination to a stored lens profile, and applies the right correction in one click. This is the fastest route when a profile exists for your lens.
There is a cost. Profile correction is built for a frame with margin, so Lightroom crops the edges slightly, and it lifts the whole frame rather than the corners alone, which can flatten the contrast in the centre. Users on dpreview forums and r/M43 regularly describe results that look too clean for their taste, particularly with older manual glass. The counter-move is simple: drop Amount below 100 on the Manual tab so the correction is partial, then put a little contrast back afterwards.
For lenses with no profile, switch to the Manual tab and work the two sliders that matter:
- Amount — how much darkening is removed. Start around 50 and work up in steps of 10.
- Midpoint — where the correction starts. Higher values keep more of the frame corrected; lower values correct only the far corners. Negative values push the correction out further toward the edge.
The Manual tab in Lightroom Classic also exposes Roundness, Feather and Highlights. Roundness moves the shape of the correction between round and oval, which matters on anamorphic or cropped frames. Feather controls how gently the correction blends from the corrected area to the untouched centre. Highlights protects already-bright corner detail from being pushed further up, which is where the grey clipped corners that give correction away usually start.
Use Paint Overlay while you adjust. It shows you exactly how far the correction reaches. When you turn it off and the corners brighten evenly, with no colour shift and no visible outline along the frame edge, the correction is right. Press the J key to hide the panels and look again, because an outline you cannot see while adjusting is an outline everyone else will see in the finished file.
4. Fix Vignetting in Lightroom With the Radial Filter
The Radial Filter is the tool for lenses with no profile, for uneven lighting that a lens profile will not address, and for vignetting that a profile fixes but over-brightens. Open the Develop module, pick the Radial Filter tool, and drag an ellipse that sits just outside the frame so its edges never touch the image border.
The default new mask inverts the inside of the ellipse. That is exactly what you want: the mask covers the centre, so darkening the masked area brightens the corners underneath. Lower Exposure by small amounts, checking after each change. Then raise Texture or Clarity slightly inside the same mask to pull back the shadow detail that the brightening softened.
Feather and Range do different jobs. Feather controls how the mask edge blends, and it needs to be generous enough that you cannot find the ellipse. Range controls how much effect the mask applies — the default is often 50, which means only part of your adjustment is actually landing. Pin the Range checkbox and the effect is applied at full strength across the mask.
After the ellipse is in place, press J and look at the frame without overlays. If you can trace the ellipse, raise the feather and shrink the ellipse slightly. If the corners look chalky, you have pushed the shadow values past their useful range, and you should back the exposure off and add texture instead.
5. Fix Vignetting in Photos in Photoshop or GIMP
Photoshop: convert your layer to a Smart Object first (Layer, then Convert to Smart Object) so the steps stay non-destructive. Then choose Filter, Camera Raw Filter, and open the Optics panel. Enable Lens Vignetting and set the Amount slider. The Midpoint slider sits below it and behaves the same way as in Lightroom. Select OK to return to the layer, then put the layer in a smart filter so you can still come back to it.
Photoshop also has a genuine vignette filter for the creative version, at Filter, then Render, then Lens Flare, and under Vignette in the Lighting effects. That one adds an edge. To remove one, stay in the Camera Raw Filter, where the controls brighten rather than darken.
For a manual correction, add a new layer filled with mid-grey, add a large soft-edged elliptical layer mask that spills well past the frame corners, and paint the layer white to brighten. Hold alt while clicking the mask to subtract back where you overdid it. Set the layer’s blend mode to Soft Light and drop the opacity until the corners stop looking lifted.
GIMP: duplicate the layer, then open Colors and add a Levels adjustment. Instead of dragging the black point slider globally, use the little arrow-and-hammer button in the levels dialog and click directly on the dark corner you want to lift. That moves the input black point for that channel alone. Add a large feathered elliptical layer mask to keep the change out of the centre, and soften it with a large blur. GIMP works in a higher bit depth than 8-bit by default for this kind of adjustment, which helps avoid banding in the lifted corners. Our walkthrough of editing photos in GIMP covers the layer workflow in more detail.
Verify at 100%. Halos and abrupt transitions are almost impossible to see at fit-to-screen, so zoom to actual pixels and look along each edge. A corner that reads as evenly lit at fit-to-screen can show a hard ring the moment you inspect it at full size.
6. Fine-Tune and Export the Corrected Photo
Compare before and after with the backslash key in the Lightroom Develop module, or with a soft-proof toggle in Photoshop. Look at the corners, the centre, and the transition between them, in that order. The correction is finished when the corners are neutral, detail is present rather than grey, and there is no colour fringe along any edge.
Make the smallest adjustment that works. If you are stepping the Amount slider back and forth, you are probably chasing a mechanical problem rather than an optical one, and the fix is on the camera, not in the panel.
If the same lens produced the whole shoot, do the correction once and copy the settings across the rest. In Lightroom Classic, select the corrected image, copy the Develop settings with Ctrl+C, then paste them onto the rest of the shoot. For a recurring lens, save the lens profile defaults with Save New Lens Profile Defaults, or build a Develop preset with the Lens Corrections panel set, so the correction travels with your kit.
Two cases need their own handling. For panoramas, correct each frame before the merge, not after, or the overlapping areas will disagree and you will see seams. For phone photos, Lightroom Mobile carries the Optics panel with Distortion Correction and Lens Vignetting; if you have no profile there, use the Radial Filter on mobile, or move the RAW to the desktop where the full panel is available.
Before you start, it also helps to have the lighting right in the first place. A simple DIY softbox or a controlled studio setup gives you an even field of light, which makes the corners far easier to judge.
Common Mistakes
Over-brightening the corners. Pushing Amount to the maximum is the most common error and the most visible one. The corners turn grey and flat, and the correction announces itself. Pull Amount back, or stop around 80 on the Manual tab and raise Texture instead.
Using a hard-edged selection. Any radial filter, mask or gradient with a tight feather creates a ring you will spot at full size. Keep the ellipse larger than the frame and the feather generous.
Treating an intentional vignette as a defect. If you added the edge darkening yourself, or the lighting genuinely falls off, correcting it removes something deliberate. Leave it alone.
Cloning before checking exposure. Cloning over darkened corners copies dark pixels and makes the patch worse. Lift the exposure first, then clone only genuine dust or sensor marks.
Stacking several fixes. A profile correction plus a radial filter plus a masked grey layer is three passes fighting each other. Pick one method per image and reset the others.
Reaching for texture or clarity too early. Adding either before the exposure is balanced sharpens noise into the corners and exaggerates the problem. Correct the light, then add texture last, in small steps.
Frequently Asked Questions
Can you fix vignetting in photos completely?
Most of it, yes. A lens profile or a careful manual mask usually brings the corners within a fraction of a stop of the centre. What you cannot undo is clipping that already happened, and detail lost to a correction that cropped the frame. Shoot RAW and keep Amount below 100 on the Manual tab to stay in control.
Is natural vignetting the same as lens vignetting?
Often, but not always. Natural vignetting is the expected falloff that appears at wide apertures and gets weaker as you stop down. Mechanical vignetting comes from a lens hood, a thick ND filter or a filter stack blocking light, and it does not change with aperture. Take the hood and filters off and shoot a test frame to tell them apart.
What is the easiest way to remove vignetting in Photoshop?
Convert the layer to a Smart Object, open Filter, then Camera Raw Filter, and work the Amount and Midpoint sliders in the Optics panel. That reuses Adobe’s lens profile data in one pass. For a lens with no profile, add a grey layer with a large feathered elliptical mask set to Soft Light and paint the corners white.
Should I fix vignetting in a RAW file or JPEG?
RAW, whenever you still have it. A RAW file holds more tonal range in the corners, so lifting them does not push shadow detail into banding the way it does on a JPEG. If you are stuck with a JPEG, work on a duplicate layer, keep the correction small, and watch the histogram in the corners as you go.
How do I know if a dark-corner effect is intentional?
Ask whether you or your lighting caused it. A vignette added in an earlier edit, a backdrop that falls off toward the edges, or a subject lit with a single source in the centre are all deliberate. Test it by photographing a flat grey surface head-on: any darkening there is a fault, and a deliberate vignette will not show up.
Conclusion: Start With the Least Invasive Fix
Look at the corners first, at 100%, with clipping warnings on. If all four are dark, take the hood and filters off and shoot one test frame, because a mechanical block is fixed by removing it rather than by editing. If the corners are still dark after that, use the lens profile in the Profile panel, drop to the Manual tab and lower Amount when the result looks too flat, and fall back to a radial filter or a masked layer when no profile exists.
Finish with a before-and-after comparison at full viewing size. The right correction is usually the smallest one you can get away with.